Before Portainer
So you know about Docker, Have run some containers and would have faced some difficulties.
Suppose you have 5 containers running Ubuntu at the same time. You can get info about them by using the docker ps command.

You would have 5 different terminal tabs running different Ubuntu containers, Imagine how much difficult it would be to keep track of what changes were made in which container and Suppose you want to run one container on a new terminal window, You would first have to find out which container it is, then find id of that container and use docker container exec -it container_id bash command.
Docker desktop does make it somewhat easier to visualise. The running containers are marked green and stopped are marked as grey.
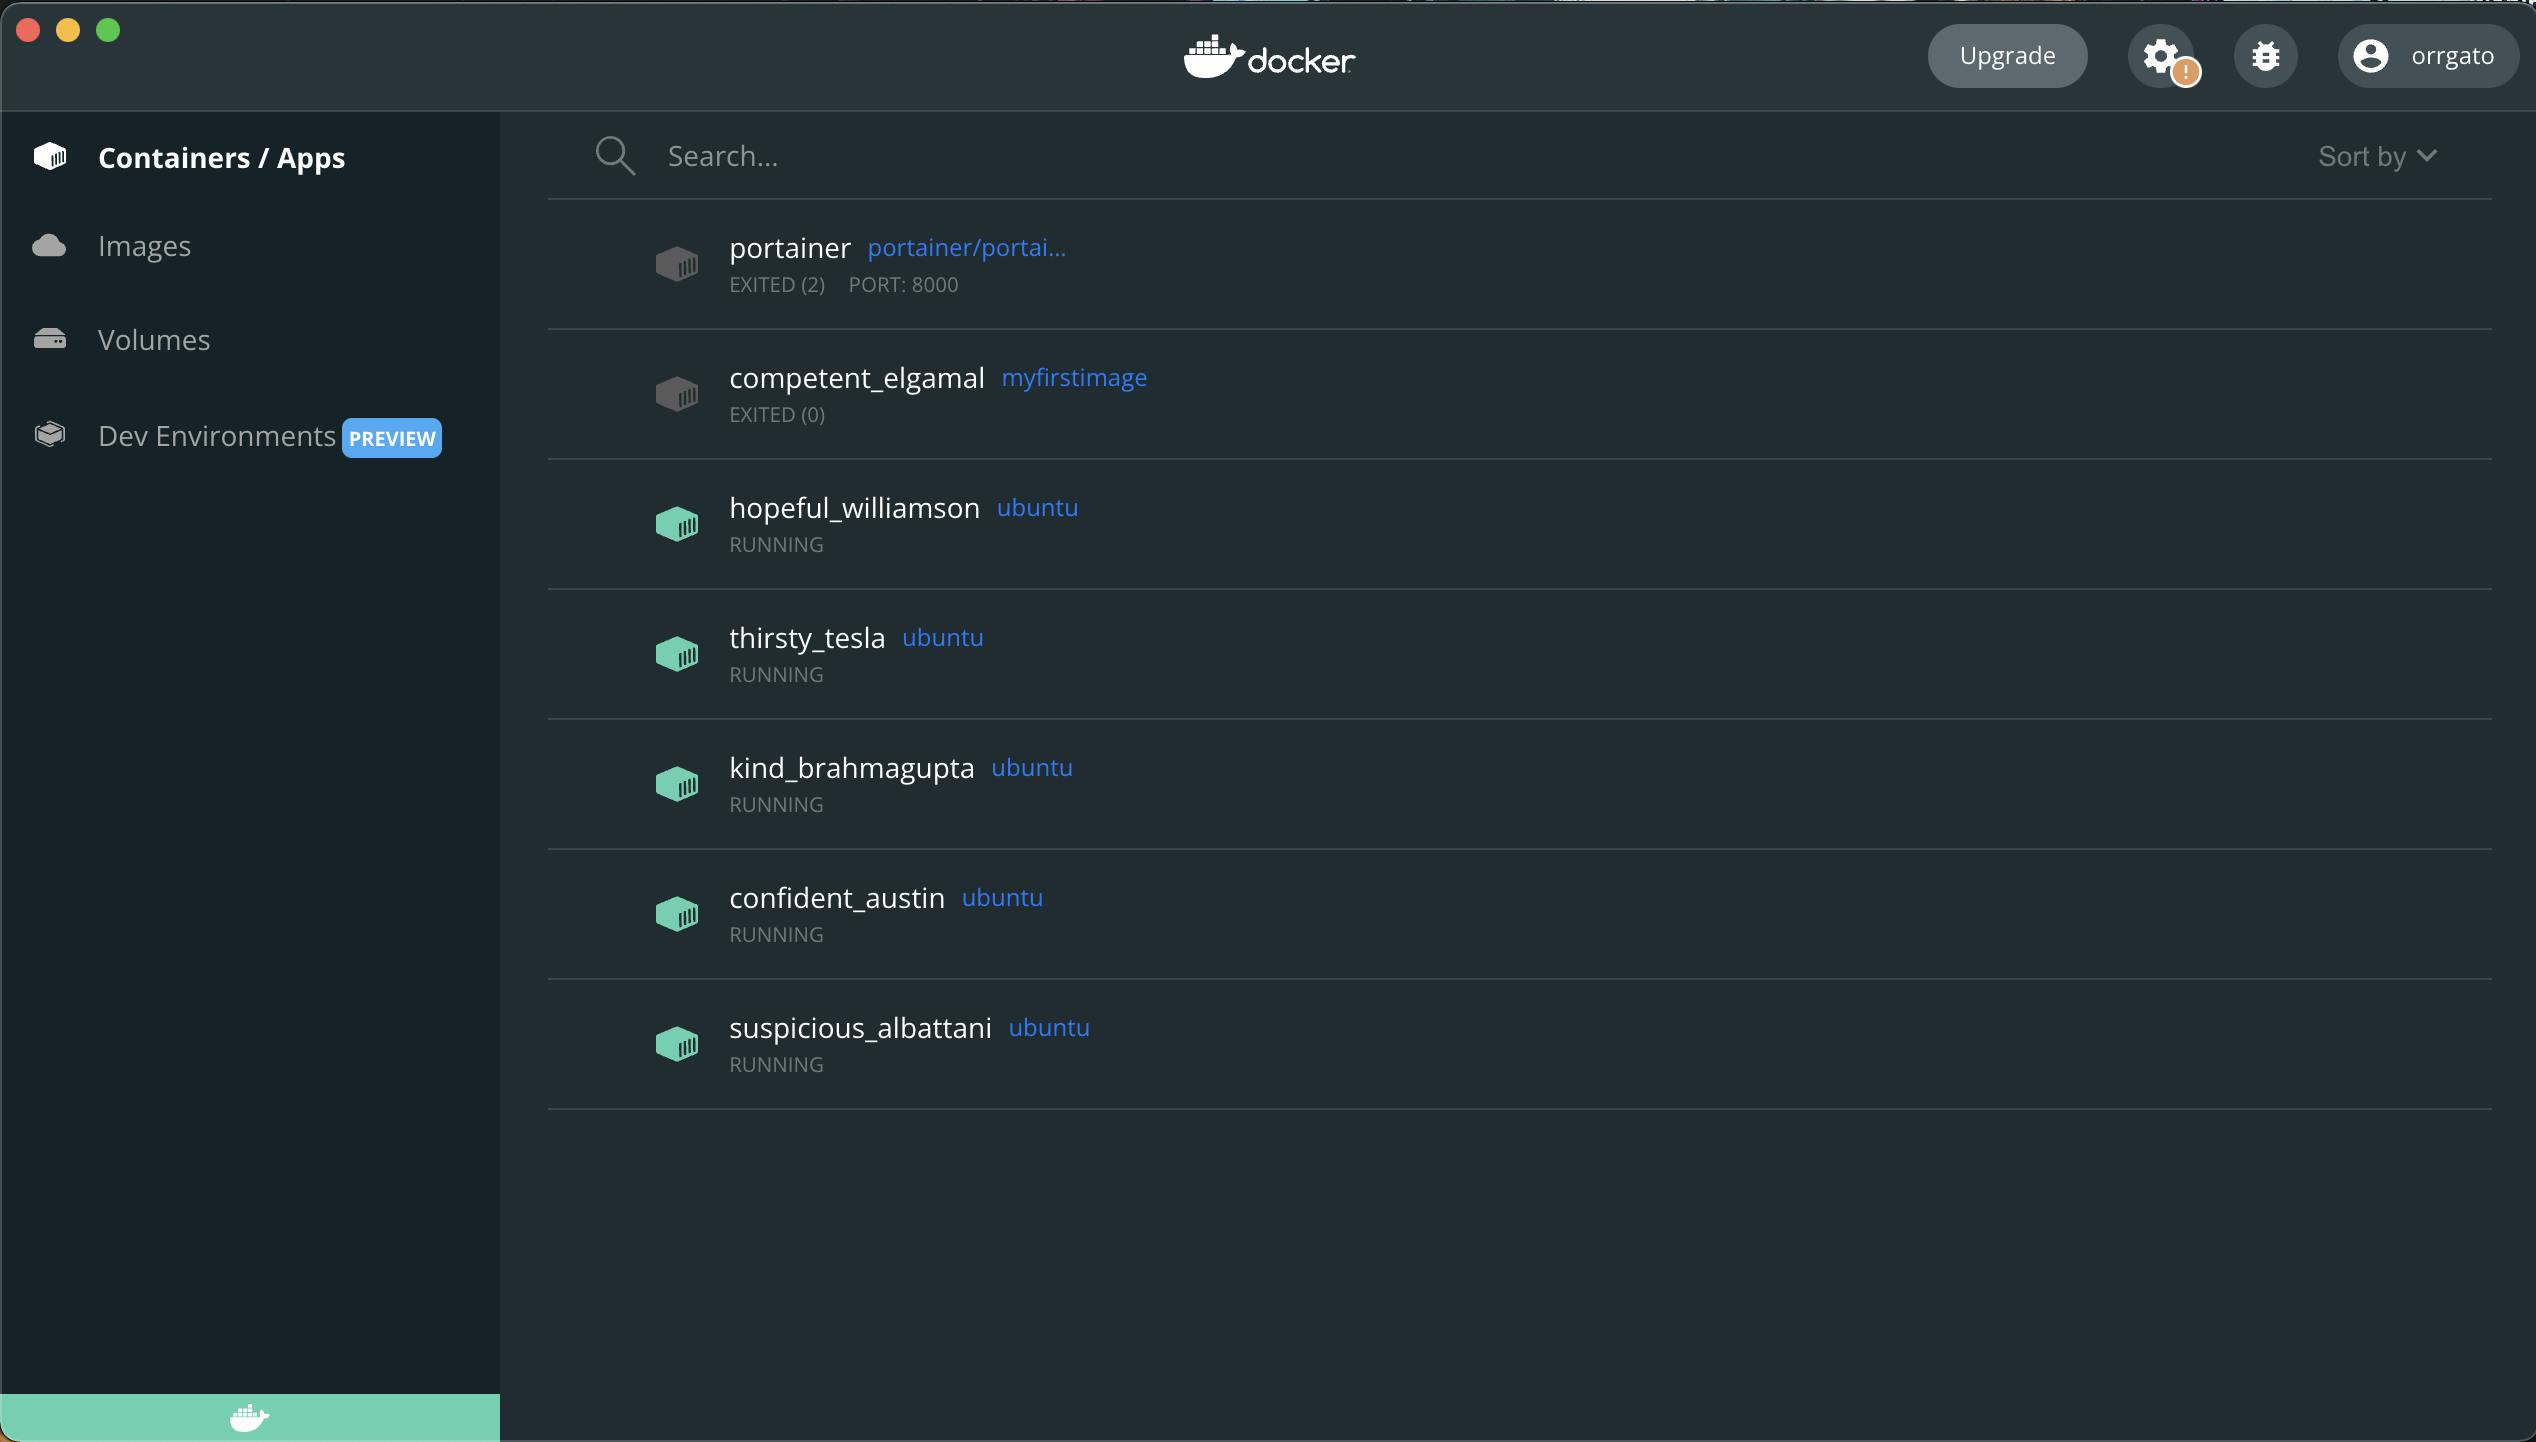
To stop all 5 containers we have to use this complex command (which I will have to google every time) docker stop $(docker ps -q) or have to first get the ids of all 5 containers and use docker stop id1 id2 id3 id4 id5.
With just 5 containers it already became a hassle, Now Suppose you have 100 or 500 containers running, Imagine how much difficult would it be to maintain them through CLI.
And If your container has port mapping, say You're running Nginx using a custom port and just like me you keep forgetting which port you assigned to it. You have to use docker ps to see the port each time.
we all can see the problem here, Adopting containers and orchestrators can introduce a steep learning curve and for some people, it can introduce pitfalls. Working with a terminal may be an arduous task for some folks. Typing commands every time you want some info or Making sense out of the terminal may not be preferred by everyone. If only there was a way to visualize containers, buttons to start/stop and maintain containers, and get information easily. It would certainly make it easier to step into the world of containers.
Yes, you guessed it right, We have Portainer 🎉.
Portainer
Portainer eases the pain and burden of managing containers and container orchestrated environments. It achieves this by reducing the need for command-line interfaces and giving us a user interface to manage local containers. Portainer helps people manage containers not only on their local but also in cloud environments even for the enterprise folks that want to manage containers and large teams at scale.
Portainer runs in your browser as a web application, providing a simple and intuitive UI to manage local as well as cloud environments thus, reducing the need for a command-line interface
If you are familiar with virtual machines, this reddit comment may help you understand portainer better.
Portainer is a really good management GUI particularly if you are running multiple docker instances, split between multiple hosts (or VMs). It's easy to switch from machine to machine, see all the docker containers and images, and delete things or stop the process -- all from one place. To understand what portainer does, even more, spin up 2 VMs on your machine and have docker run on all the VMs. To manage docker on each VM, you will have to access each host via ssh and then control docker through the CLI. With portainer, you could access all the docker processes on all the VMs and control them with one interface.
Another awesome feature of Portainer is its Application Templates List. You can use this list to automatically create and run containers of popular services such as Nginx, MySQL, Joomla, Jenkins, and Redmine.
This is just the tip of the iceberg, it does a lot more.
Portainer Architecture
Portainer runs in a container and can run on a virtual machine or in a Kubernetes cluster. It is an example of Container as a Service (CaaS).
Portainer consists of two elements:
Portainer Server
This is the central point of operations.

All the things that happen in Portainer, happen around and through the portainer server. Portainer server, while working with Portainer Agent needs seamless access to the remote environment and doesn't need one while working with Portainer Edge Agent which we will discuss in this blog.
We can also use the Portainer server, and plug agents into all our environments such as Docker swarm cluster or a Kubernetes cluster.
Portainer Agent
Docker provides an API for interacting with the Docker daemon called the Docker Engine API. The Engine API is an HTTP API served by Docker Engine. It is the API the Docker client uses to communicate with the Engine, so everything the Docker client can do can be done with the API.
The user interactions with specific resources (containers, networks, volumes and images) are limited to those available on the node targeted by the Docker API request. The purpose of the agent aims to allow previously node specific resources to be cluster-aware, all while keeping the Docker API request format.
The agent can run on docker machines if you want to run containers, or it can run on docker swarm clusters or Kubernetes clusters in local private networks. Portainer agent is great for working with local or private networks, as there is no requirement for additional safety features. But for public or production environments, Portainer provides an edge agent. The edge agent communicates via an encrypted TLS tunnel so the edge agent is not public and is not exposed to the internet.
Agent vs Edge Agent
Portainer has two types of agents: Agent and Edge Agent.
If you are running local docker machines or local Kubernetes clusters where portainer agents won't be public then you can run the default agent but if you're running docker machines or Kubernetes clusters in the cloud where portainer will have a public endpoint we'll use the edge agent.
You can have as many Agents and Edge-Agents talk to the portainer server, which provides the ability to manage multiple clusters from one centralized interface.
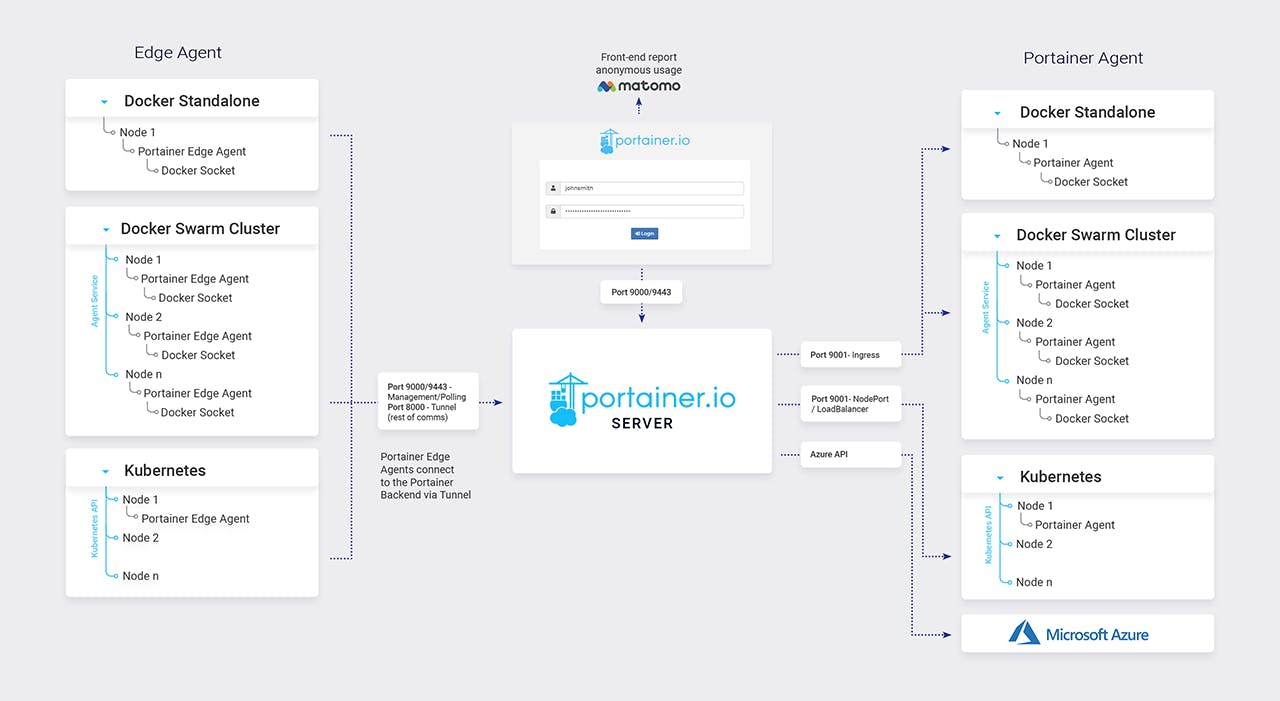
To know more about the portainer agent, refer to the docs
Installation
I am installing Portainer for docker standalone on the docker desktop. You can follow along or Portainer provides a hassle-free installation guide, which you can access here.
Start by creating the volume that Portainer Server will use to store its database:
docker volume create portainer_data
Next, run the following command:
docker run -d -p 8000:8000 -p 9443:9443 --name portainer --restart=always -v /var/run/docker.sock:/var/run/docker.sock -v portainer_data:/data portainer/portainer-ce:latest
Let's deep dive into what this command does,
- it starts with
docker run -d, which is used to launch a container in background mode -p 8000:8000exposes the port for tunnelling, so the edge agents can talk to the server.-p 9443:9443exposes the port for UI and API.--name portainernames the container 'portainer' instead of those random names docker gives such as "thirsty_tesla"--restart=alwaysstarts the container automatically, when the docker daemon restarts.v /var/run/docker.sock:/var/run/docker.sockmounts in the docker sock so that we can manage local containers.-v portainer_data:/datamounts the volume we created through the earlier command to persist dataportainer/portainer-ce:latestruns containers latest version
After running both commands, You should see something like this

Finally, run the docker ps command to check if the portainer container is running.

Here you can also see the ports we specified earlier.
After these 3 commands, You don't have to write a single more command. All can be done using Portainer. Here's How.
Portainer Demo
After successfully installing and running portainer, Open your browser and type in :
https://localhost:9443
You might see a browser error message stating that the URL is not safe, You can ignore that message for now.
You will be prompted to enter a username and password to create a user account.
After logging in, Press Get Started to reach the following screen.
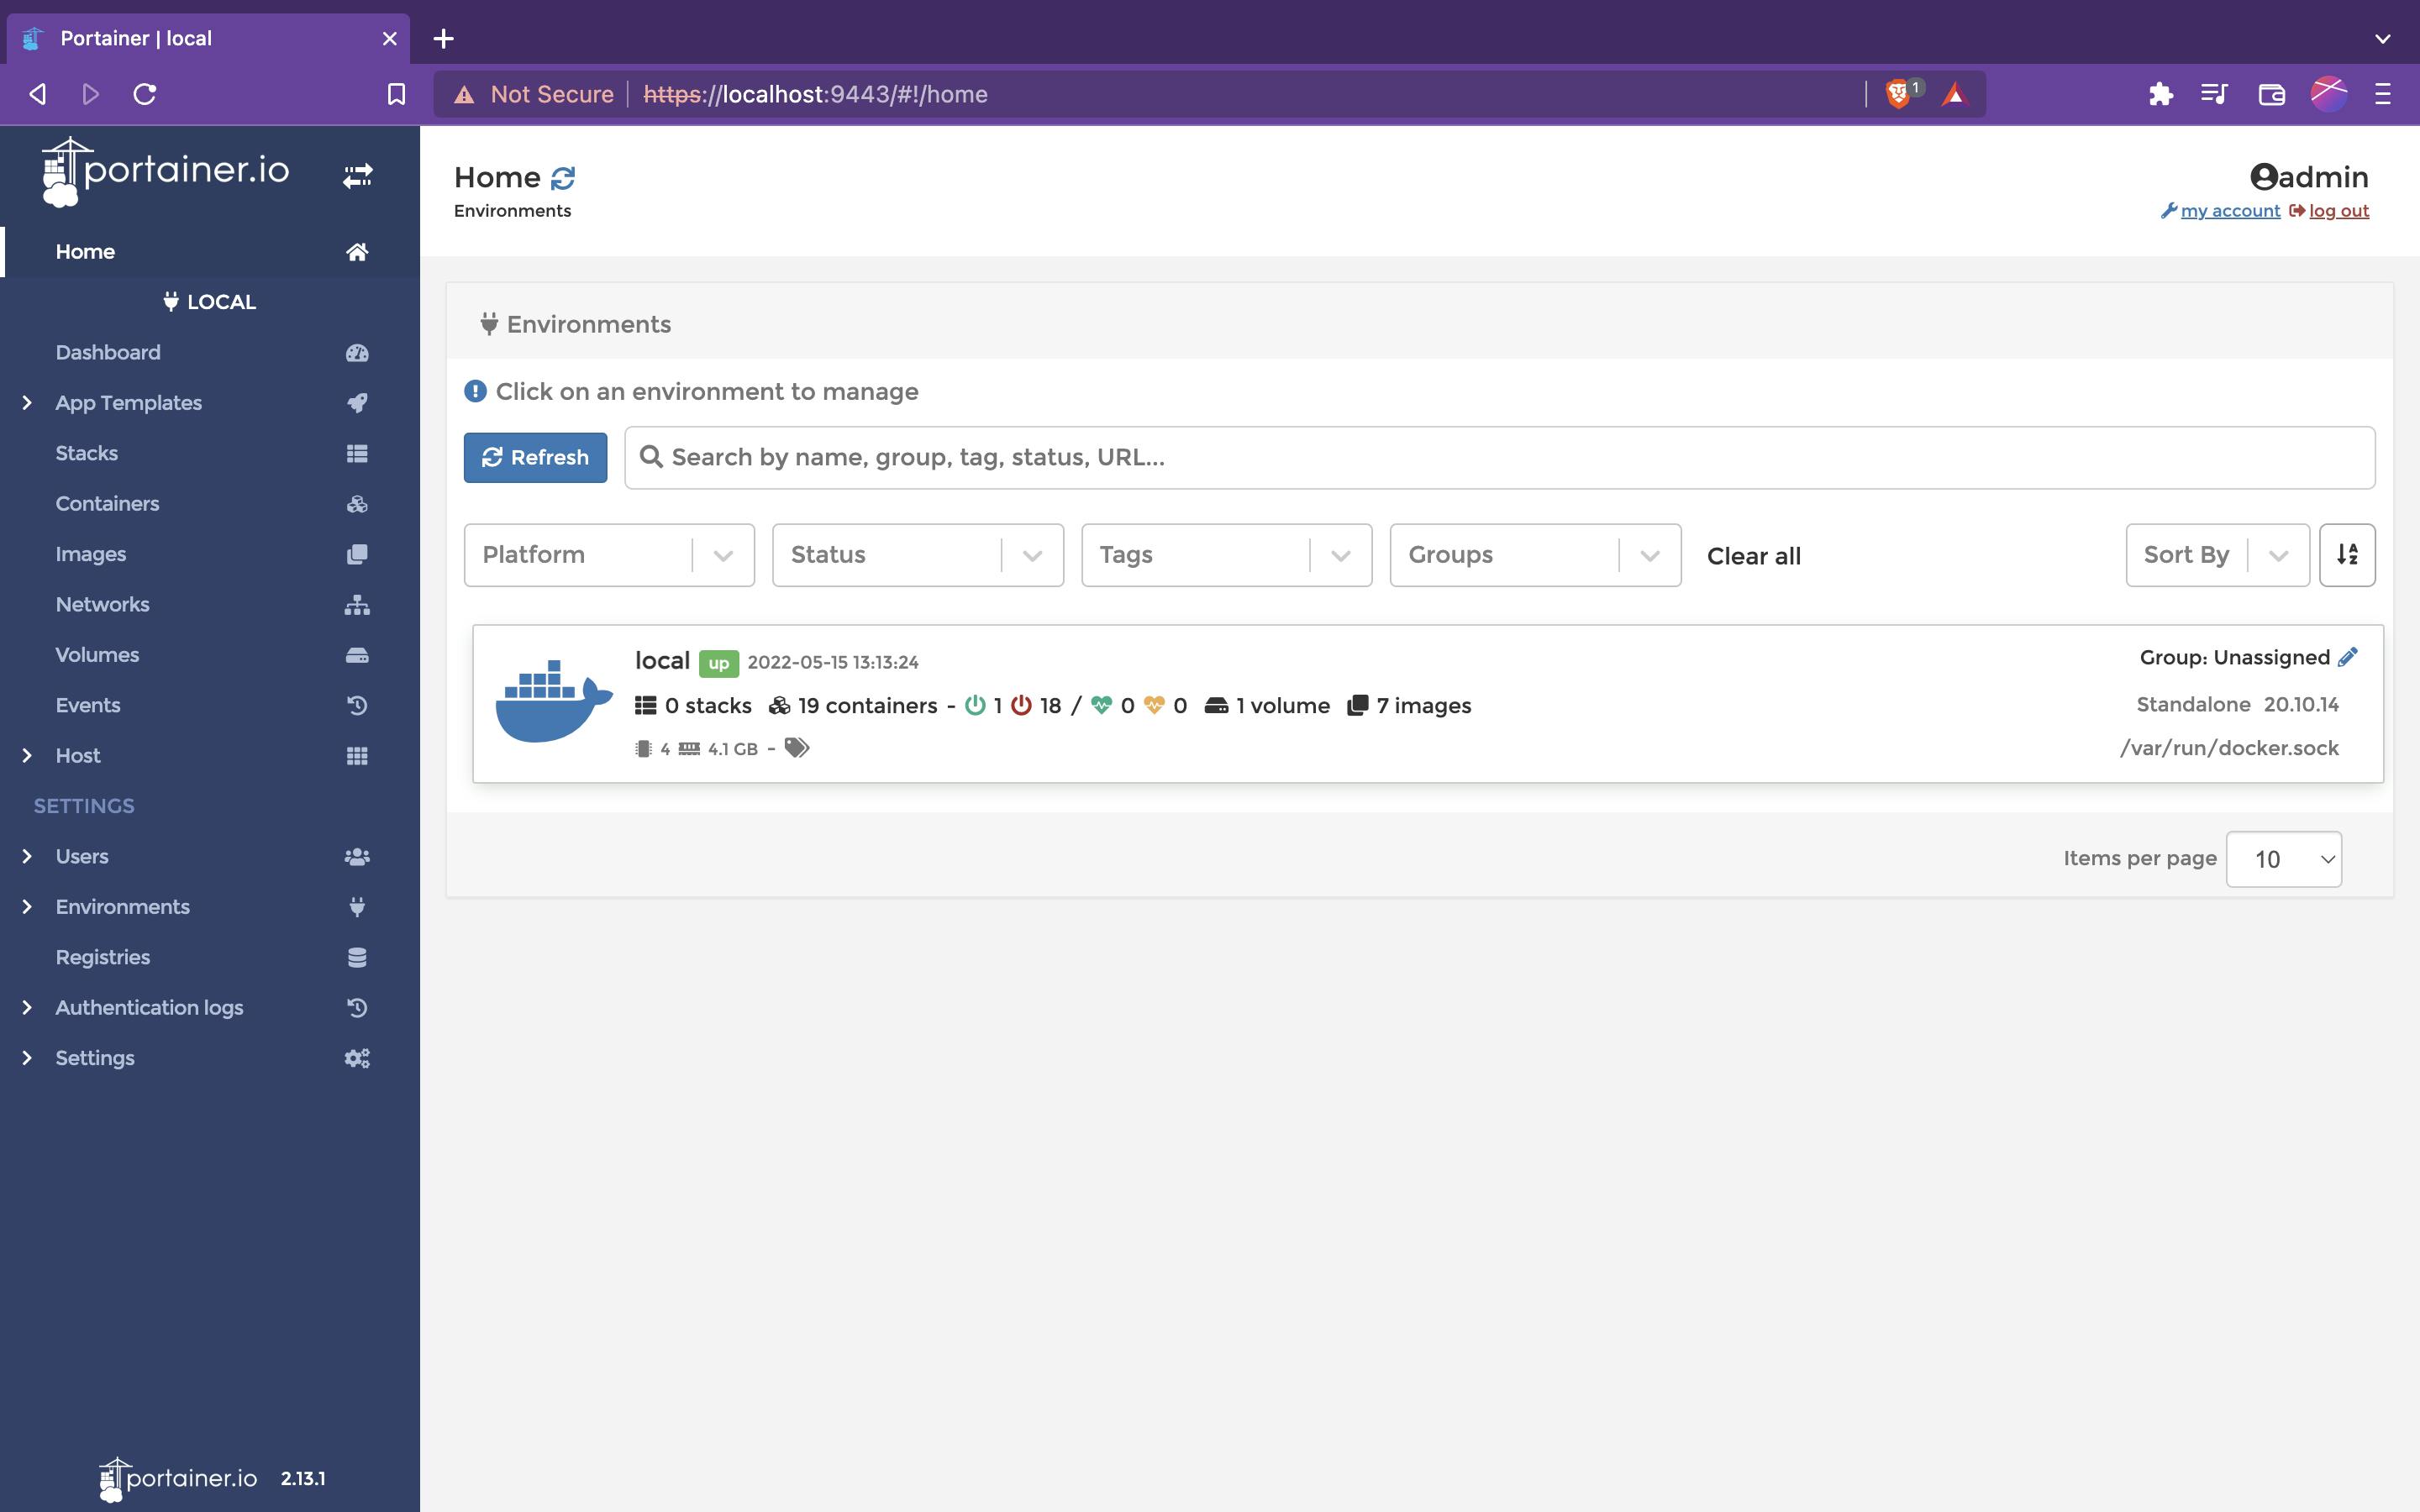
This Home page is the first page you will see after logging into Portainer.
Here you can see your environment.
Here I, and most probably you will have just one environment Local. These are the locally running containers and Clusters.
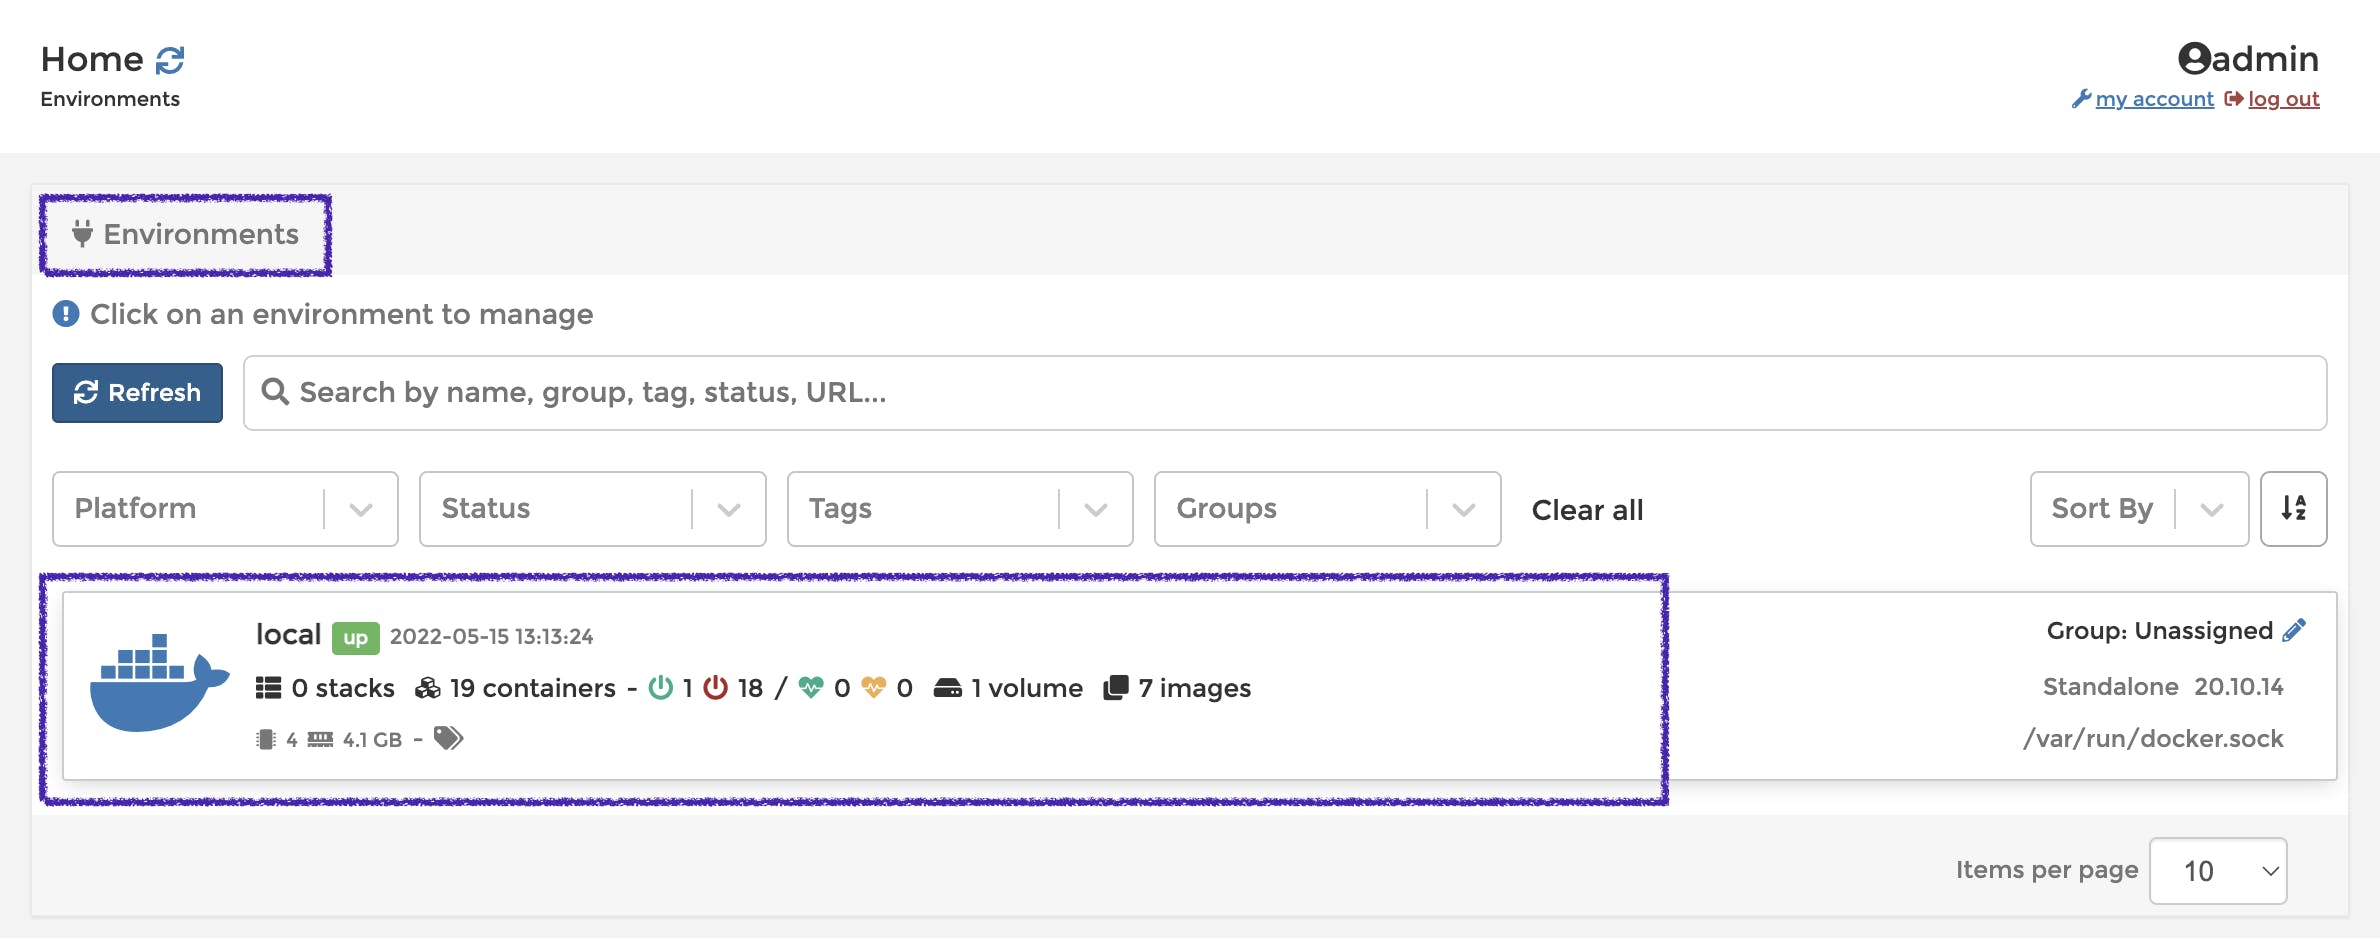 Click on local to be redirected to the following screen -
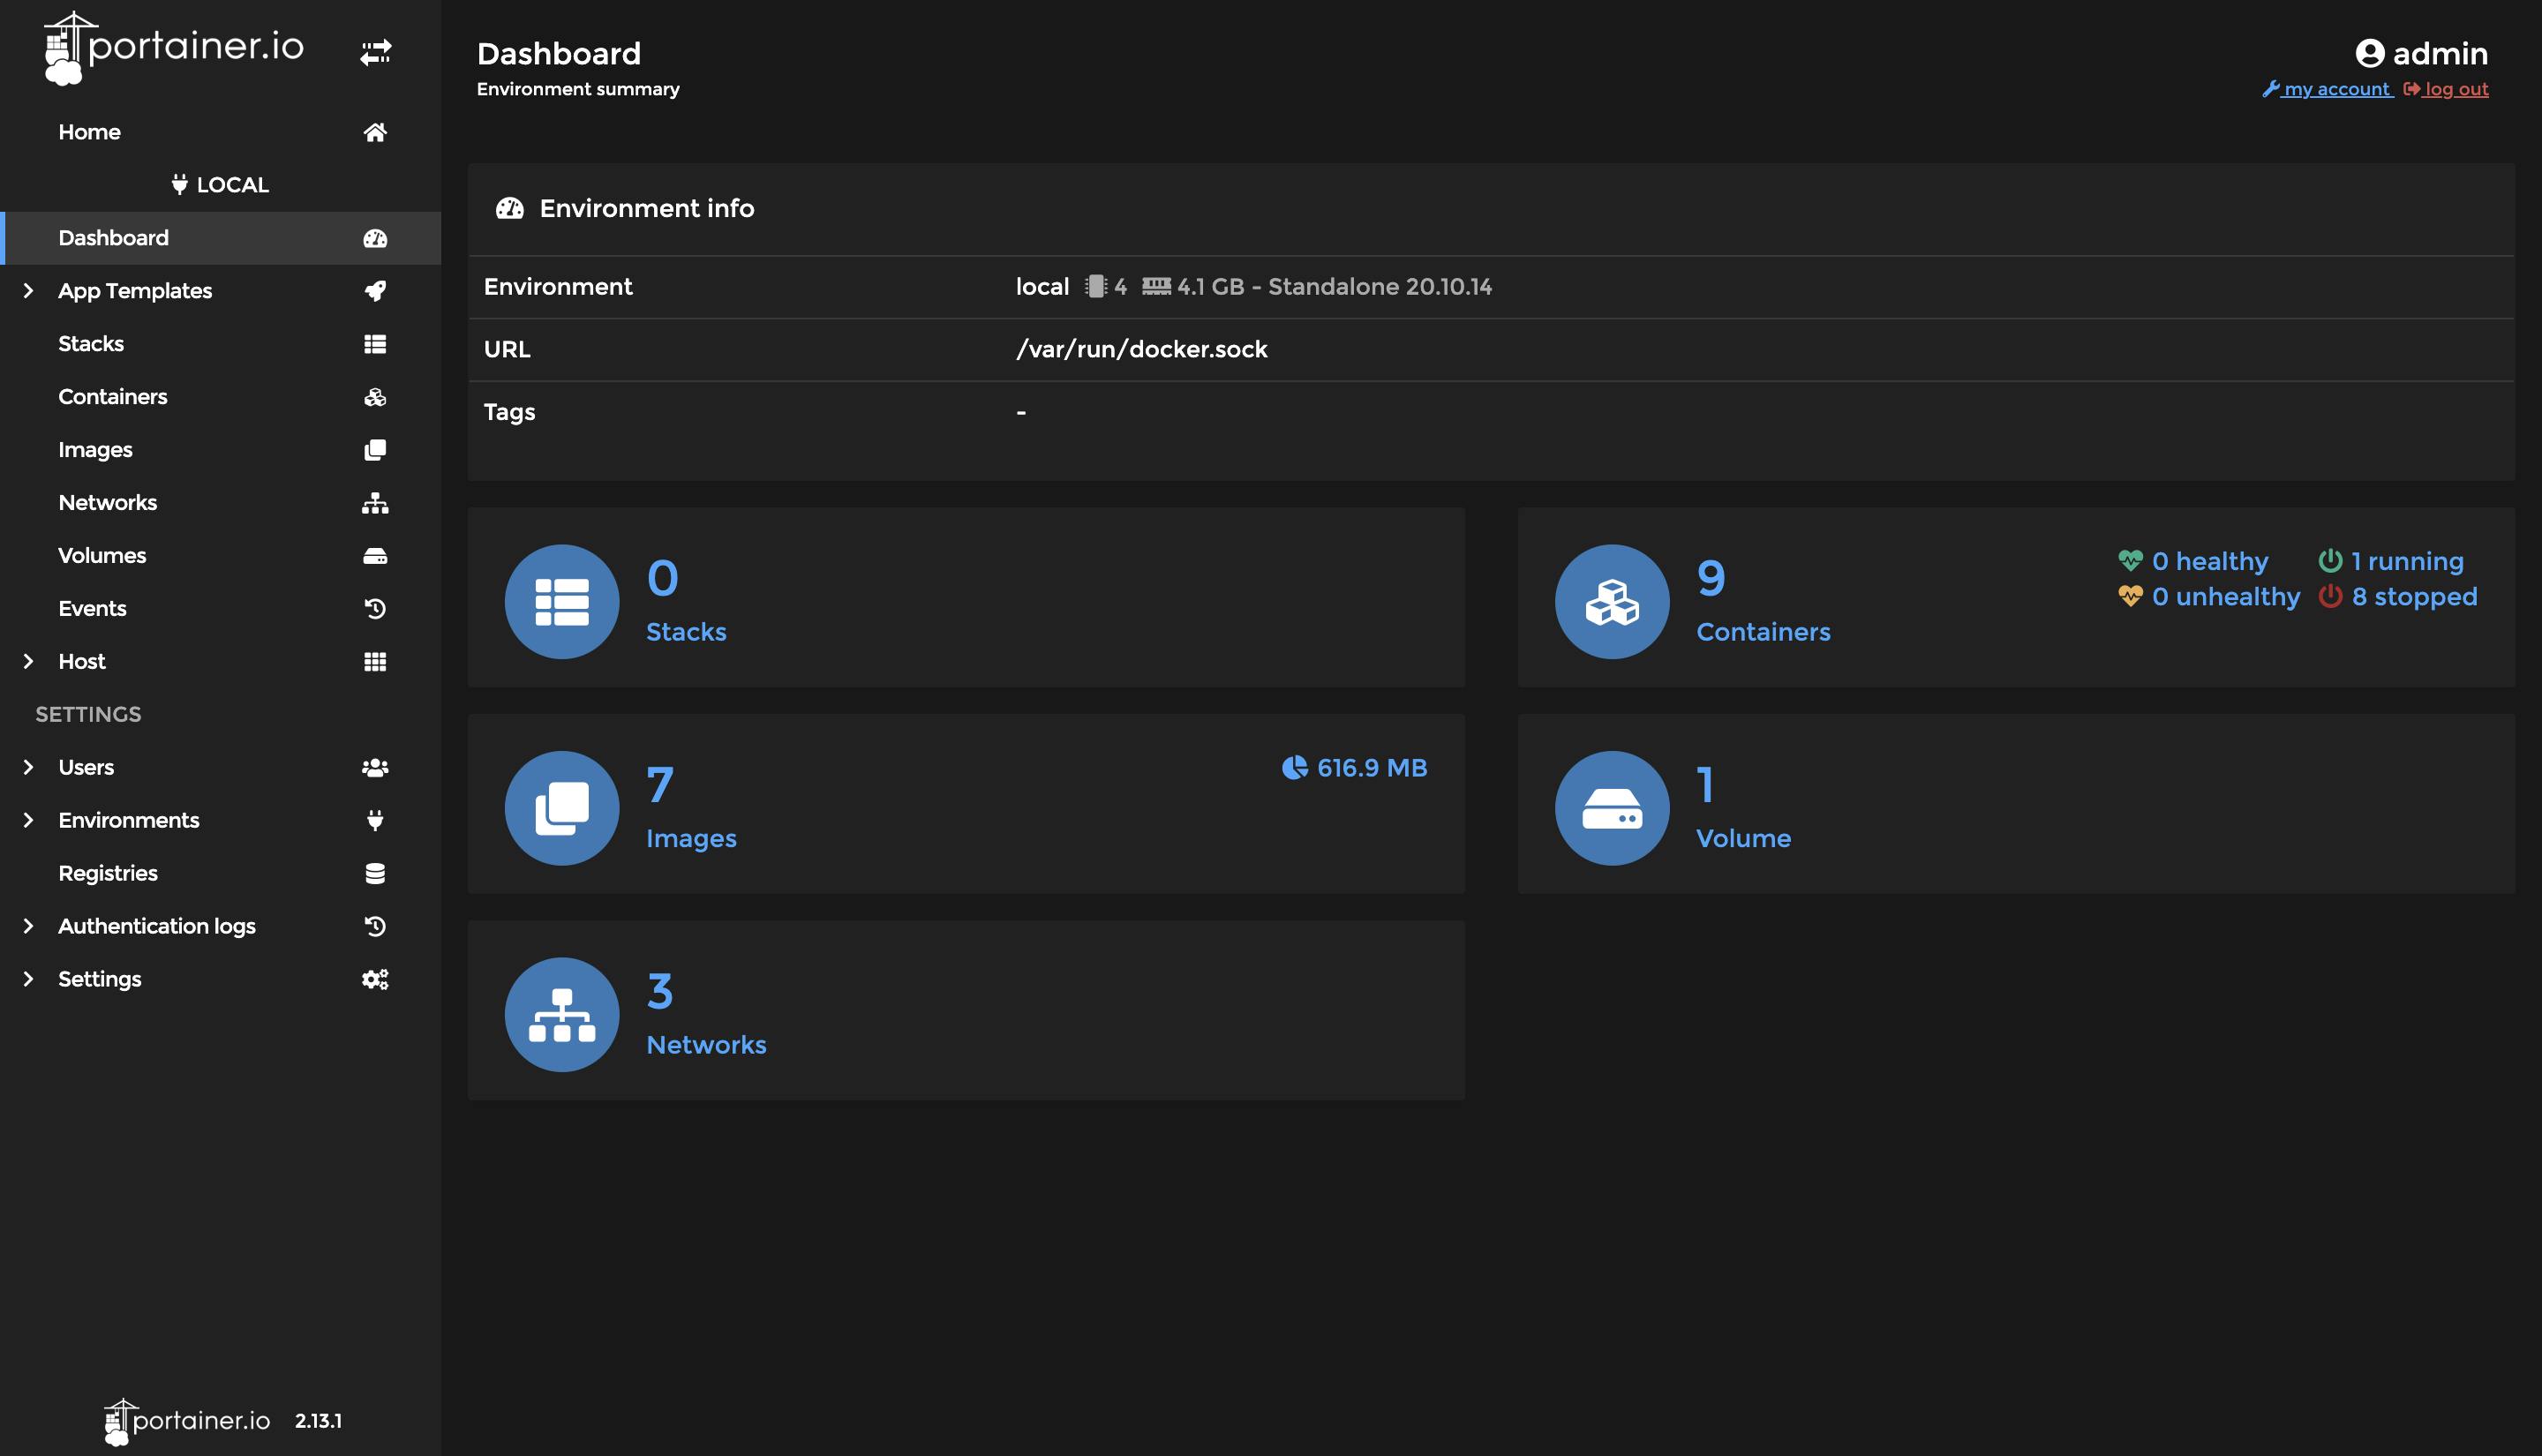
You can view your dashboard, running containers, volumes, networks, images, and more from the sidebar.

View Containers
To view all the containers, click on Containers. You will be presented with all running as well as stopped containers.
This is the same, more advanced rather, as typing the
docker ps -acommand in the terminal.
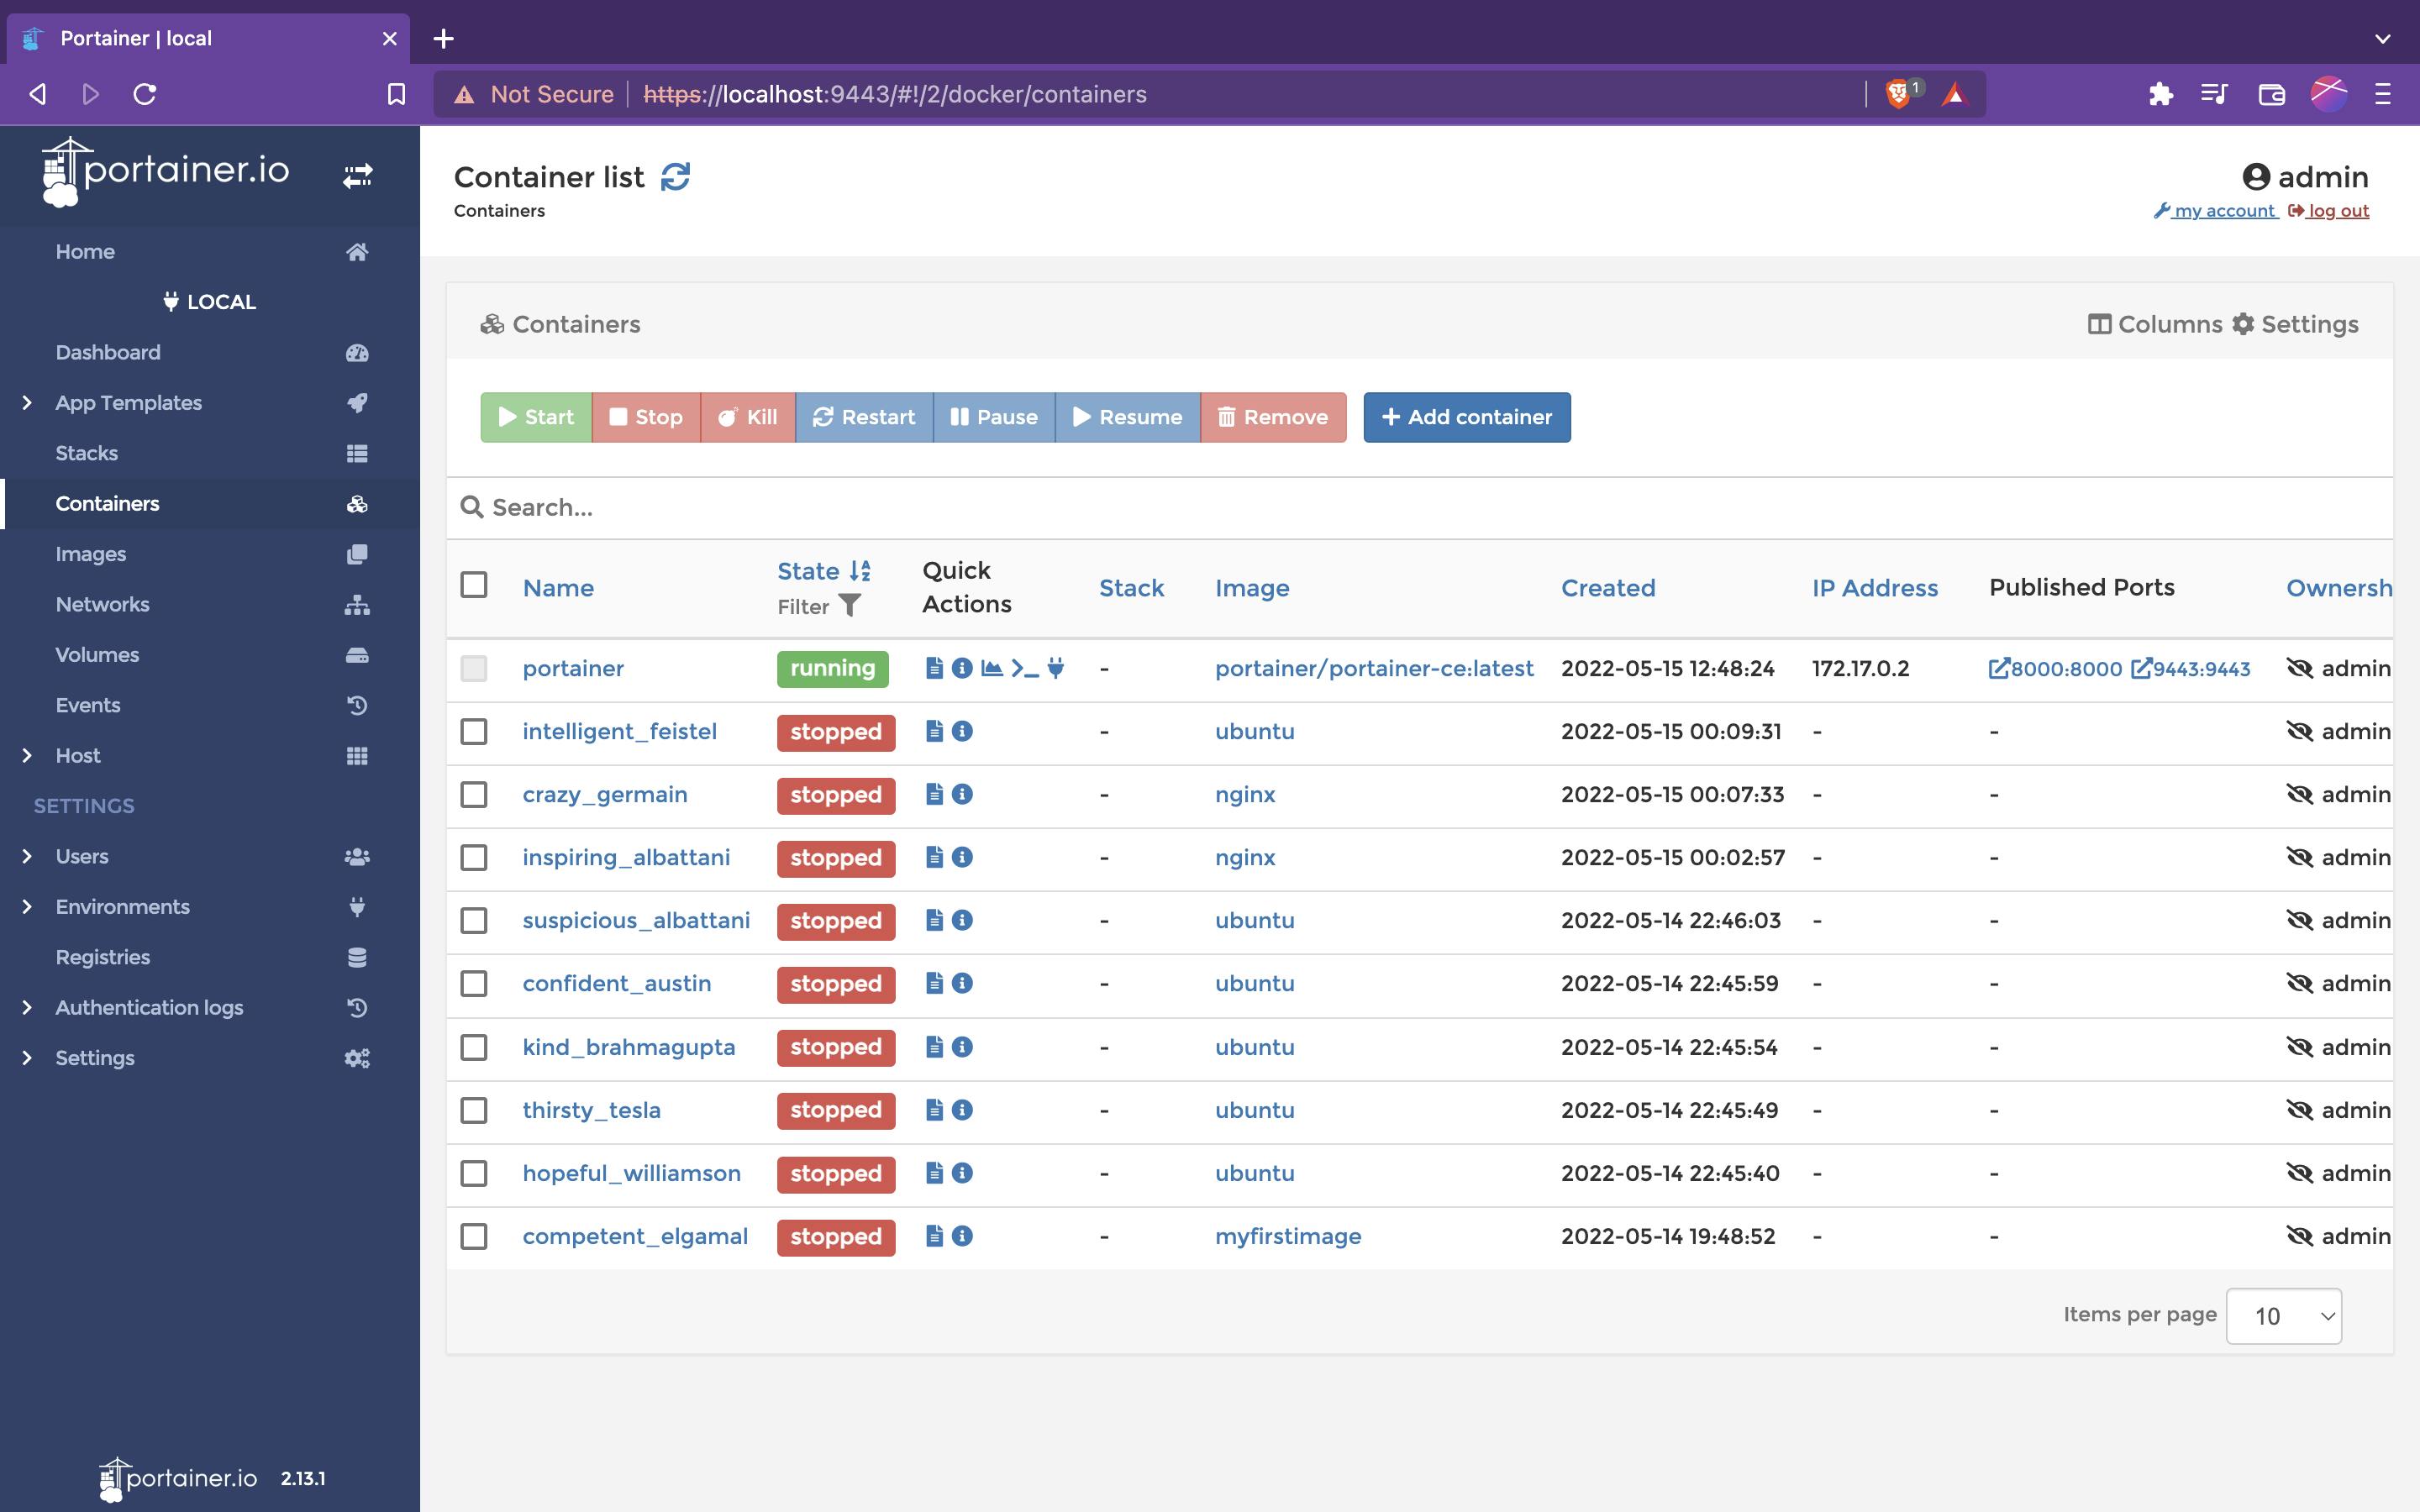
At first glance, you can see information such as the name, state of the container, the image that container is using, the ports that container is using and ownership scope. You can perform most of the basic functions using this screen.
You can also see the buttons to start, stop, and remove containers. You can select containers through checkboxes and perform the same actions on them at once.
To stop all the containers at once. Instead of typing in
docker stop $(docker ps -q)command we can select containers through checkboxes and click on stop. It becomes that simple.
Say you want to start 5 containers at once. Without portainer, you would have to specify ids of each container after docker start
docker start container1_id container2_id container3_id container4_id container5_id
You would have to use docker ps -a to see the containers and copy paste each id one-by-one
With portainer, It is as simple as selecting those 5 containers with checkboxes and pressing start.
Add a container
Let's add a Nginx container, follow along to learn by doing. To add a container, Click on the + Add Container option.

You will be directed to Create container page.
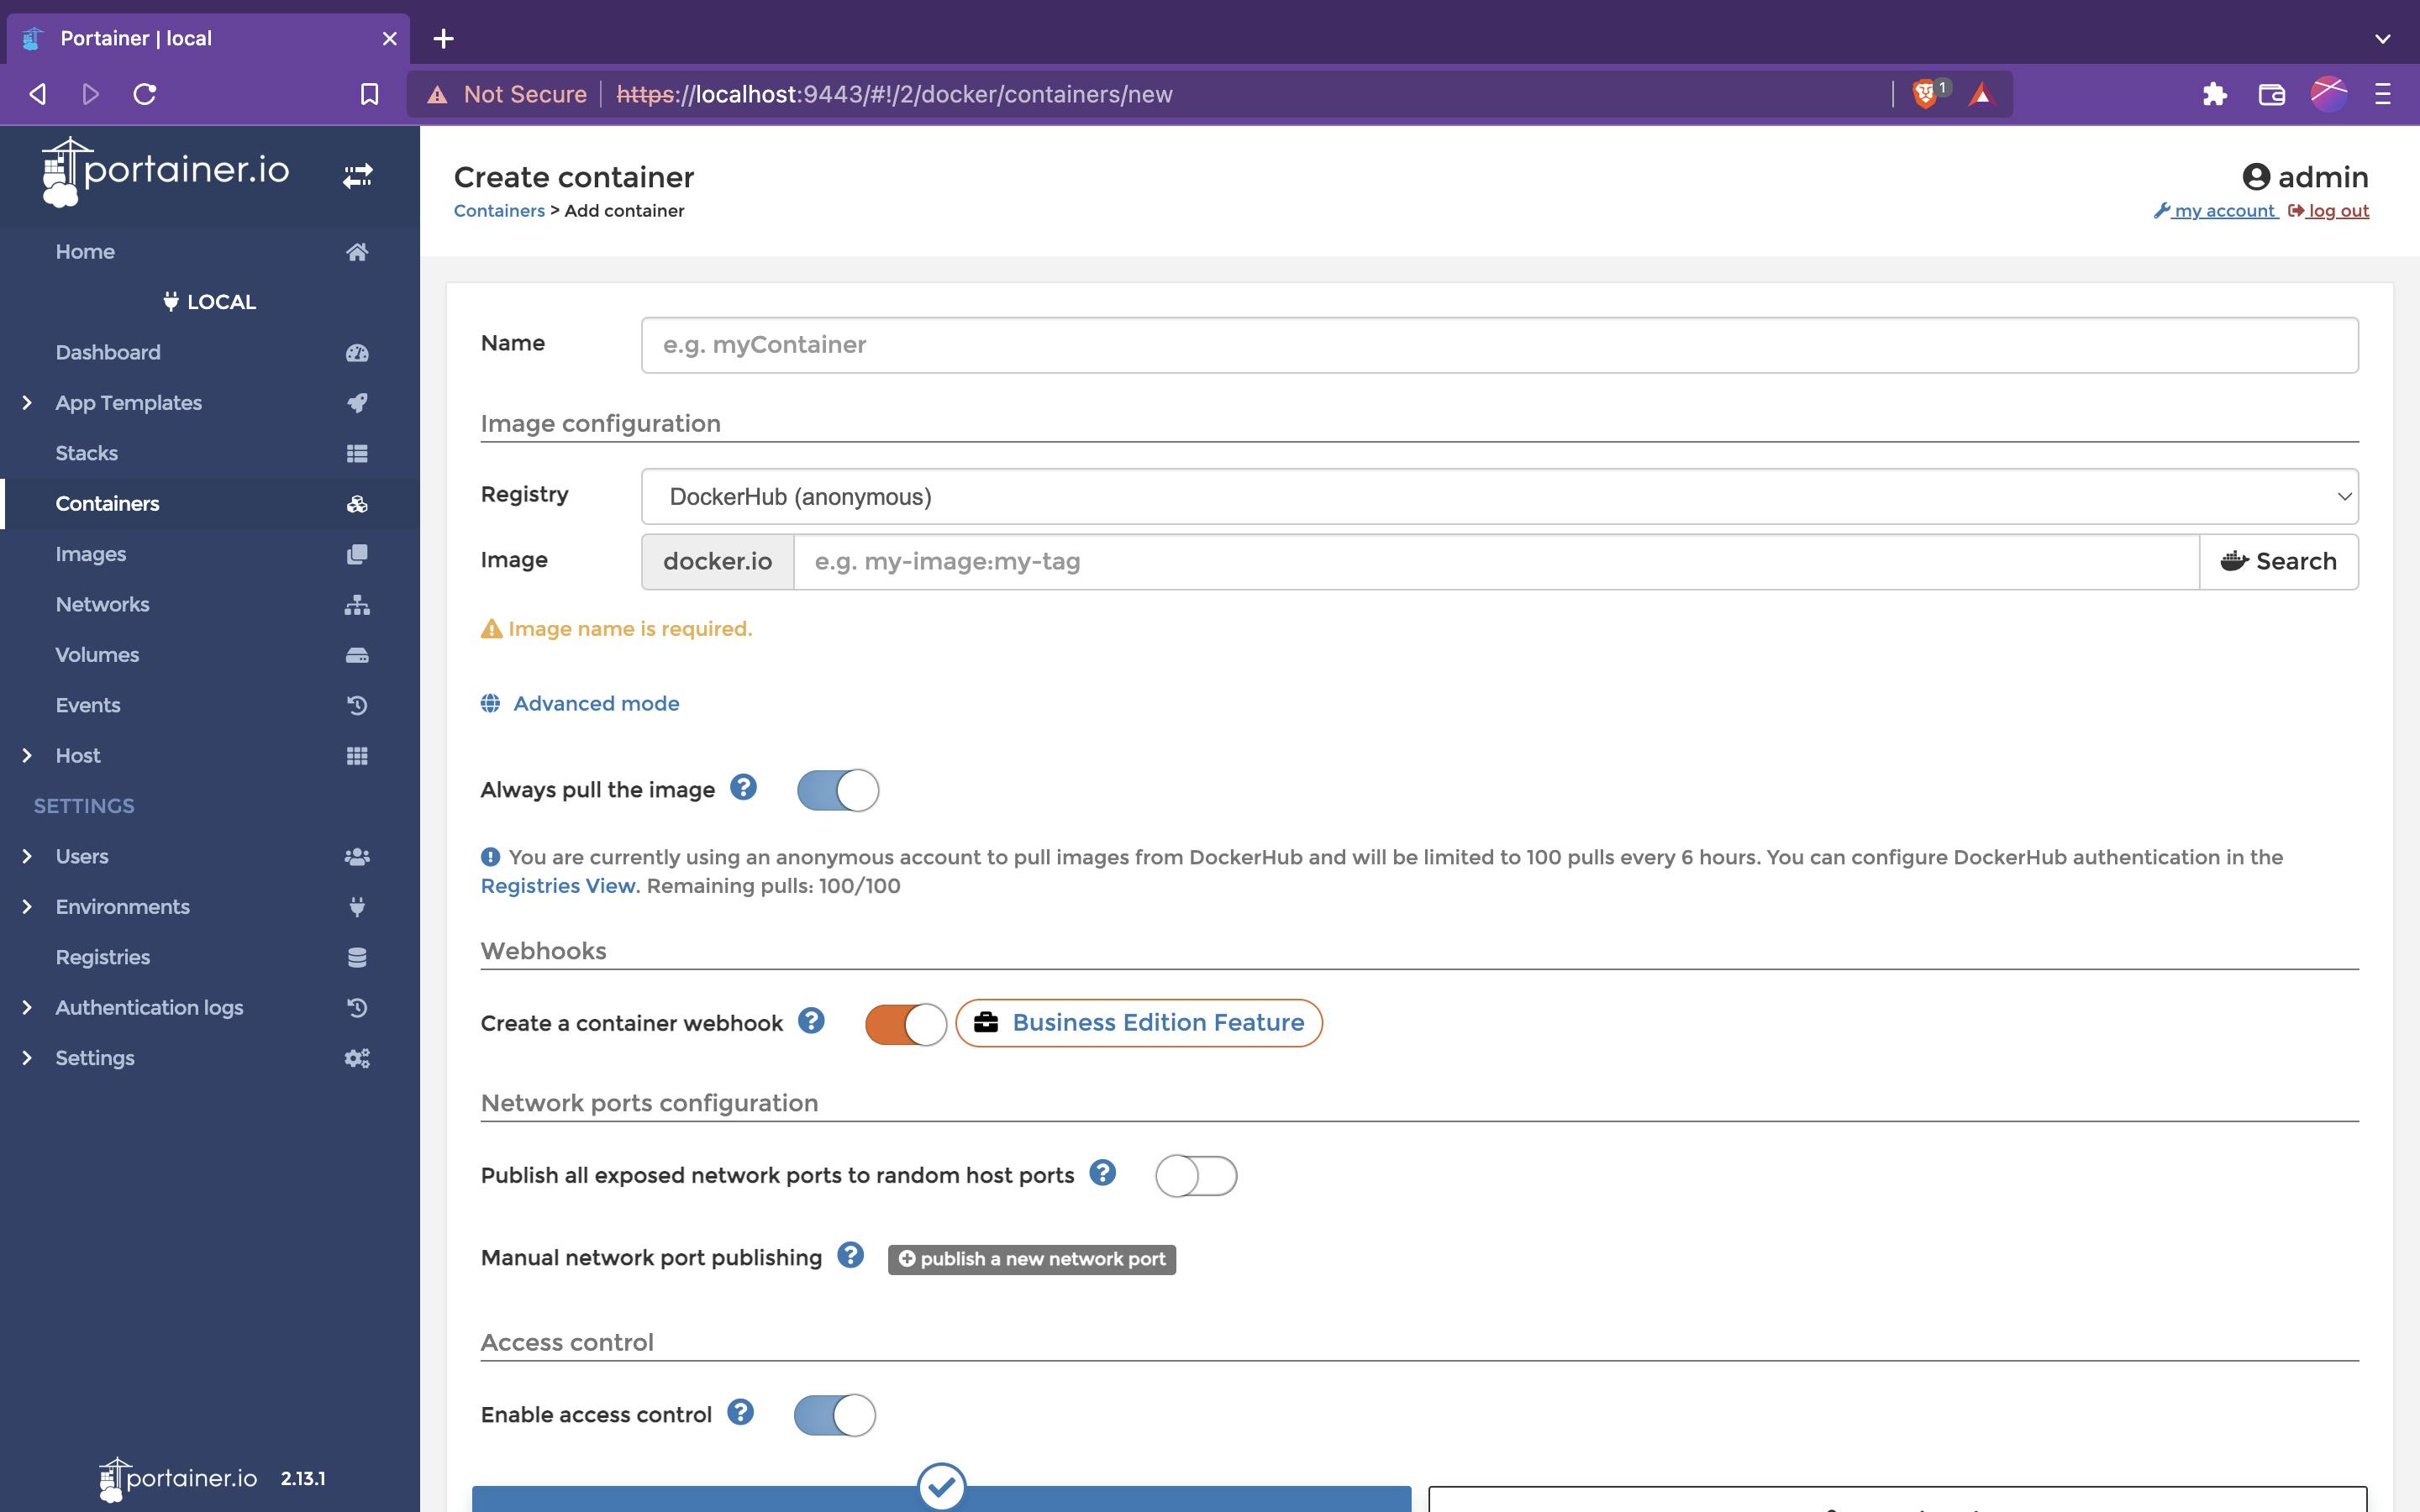
It may look overwhelming at first, But Trust me It gets a lot easier once you are familiar. On the top we see the Name option.
This is the same as using
--name container_namein docker run command. You can specify a name for your container or leave it empty.I will name it
myNginxContainer.
Registry will be set to DockerHub, i.e the image will be pulled from DockerHub.
You can add registry by selecting registries from the sidebar and Clicking on the + add Registry option.
By default Portainer uses an Anonymous account to pull images from DockerHub which limits the pull limit to 100 every 6 hours.
You can add your DockerHub Authenticated account under Registries to remove the pull limit.
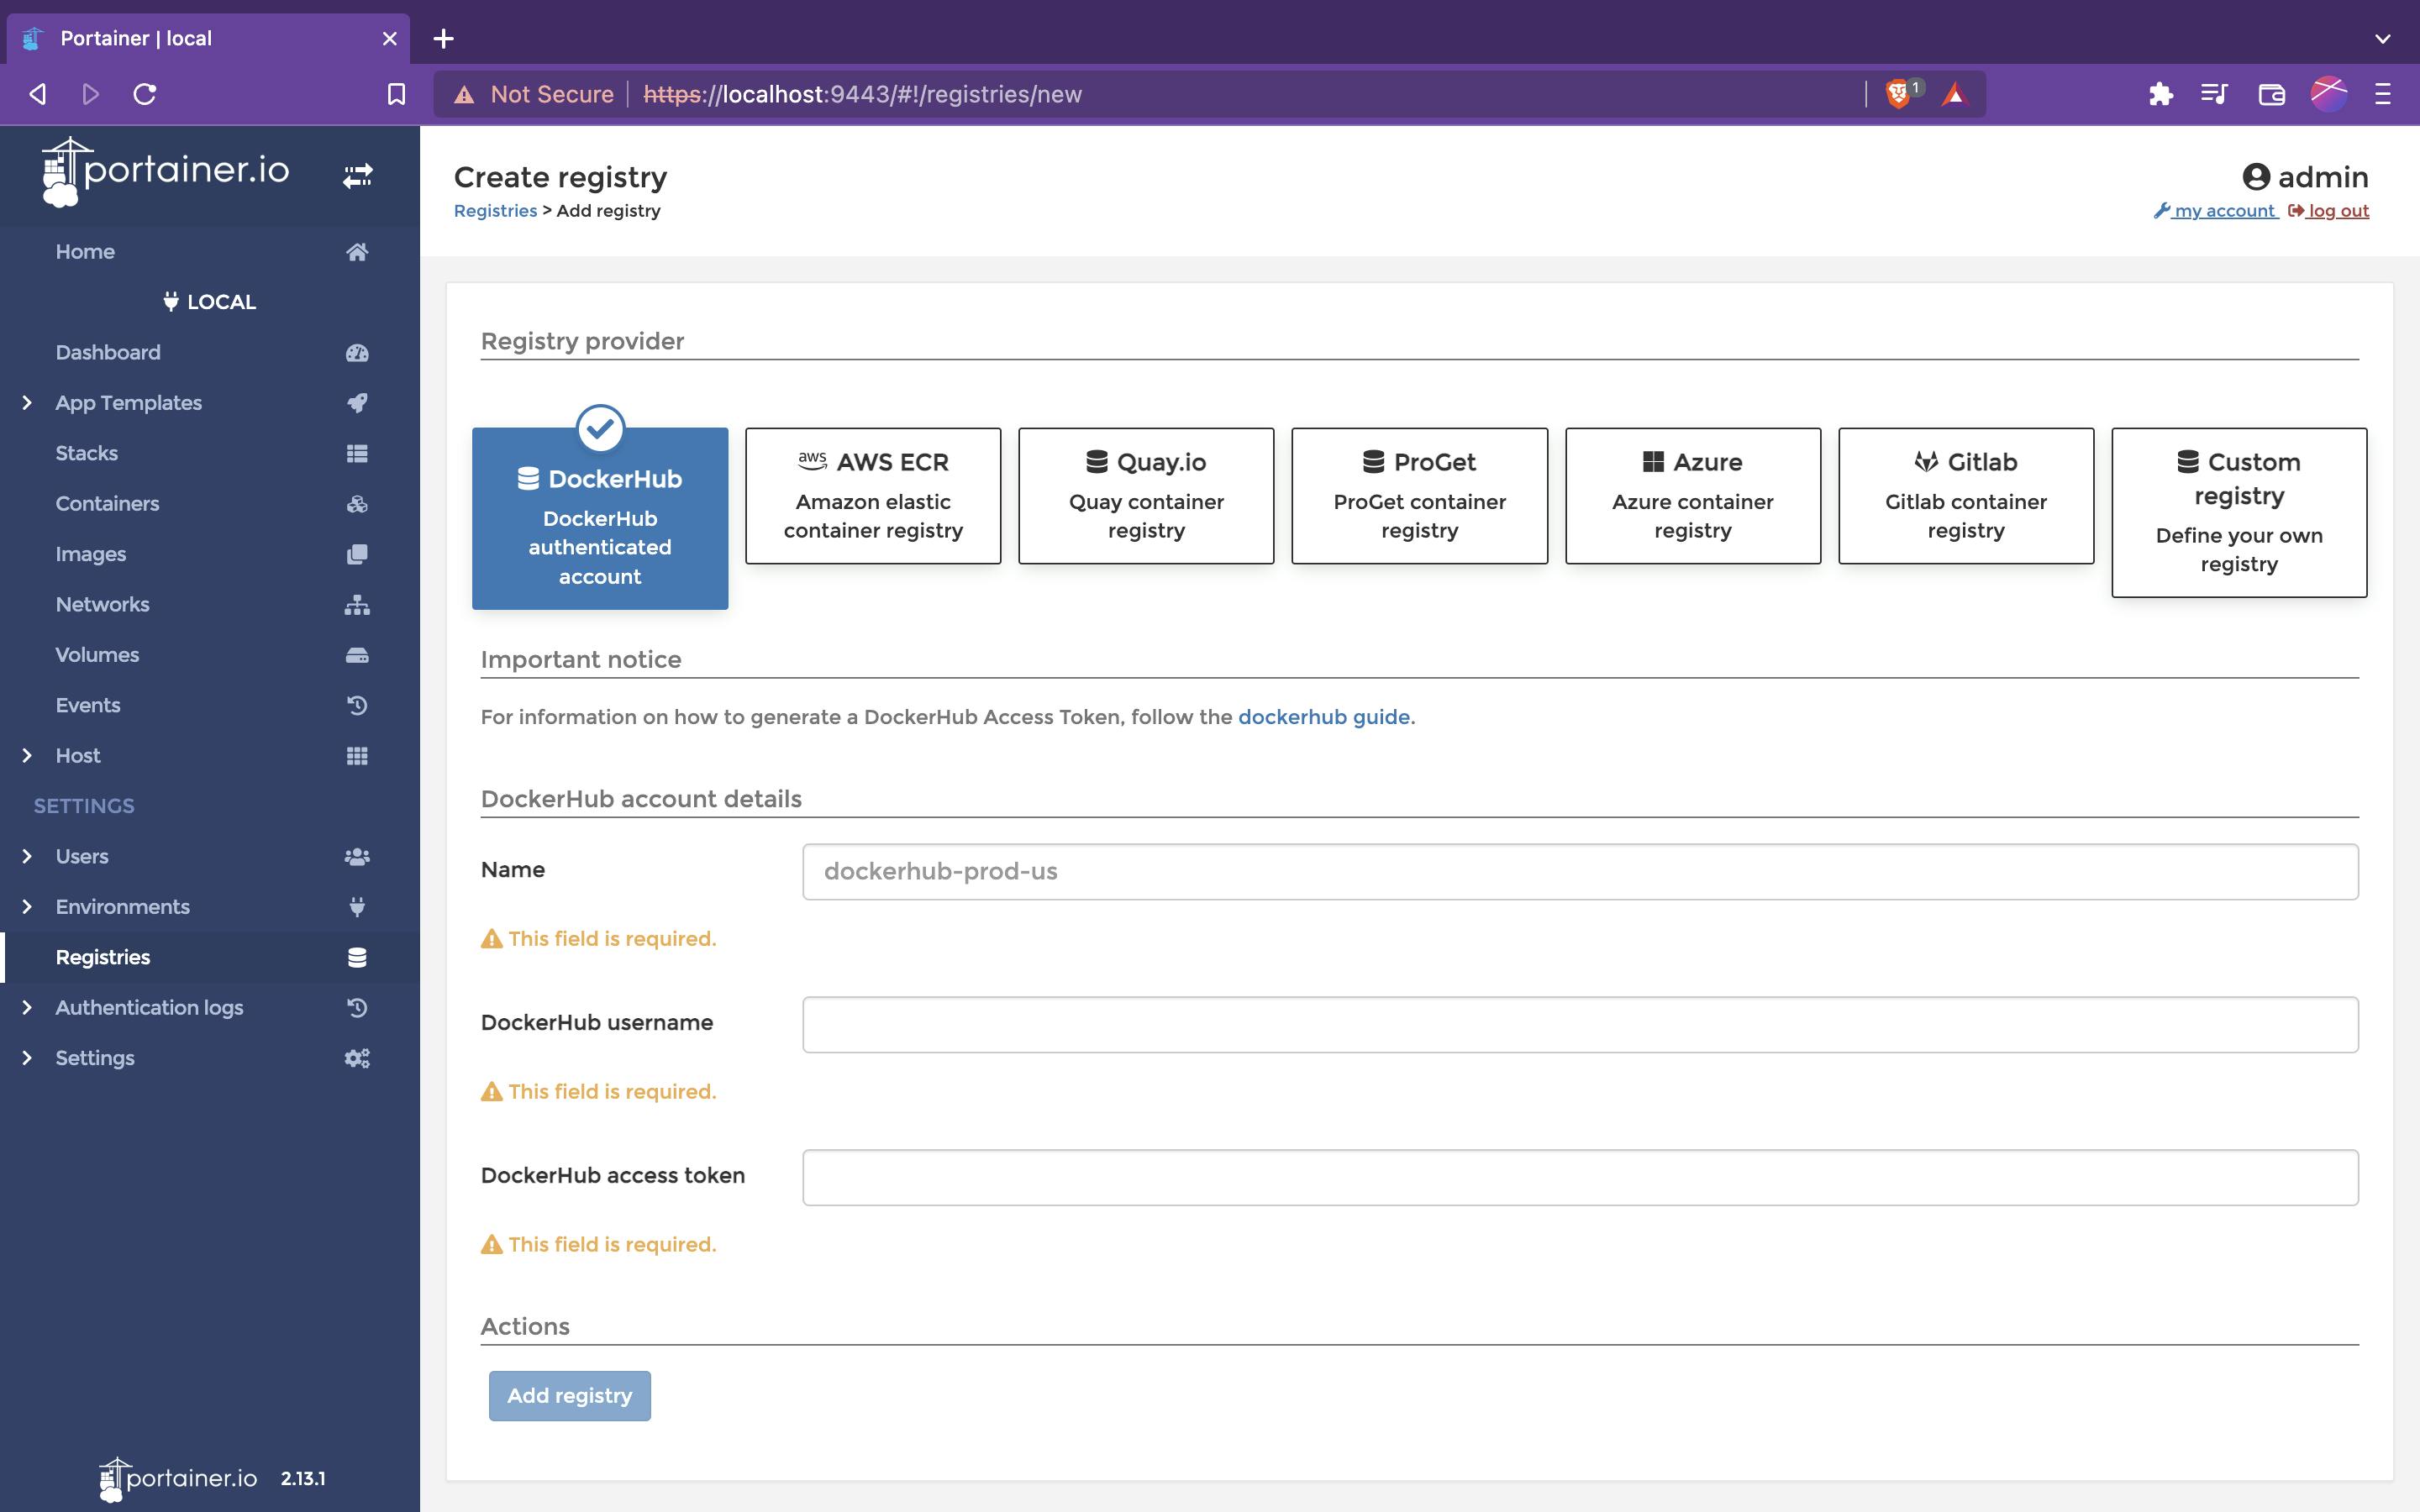
Back to adding container, enter the name and tag of image. You can check if you are entering the correct name by Clicking on the search button which will take you to the registry.

Enter
nginxto pull latest version of Nginx.
The Always pull the image option makes sure that you are pulling the image before creating the container.
Under Network ports configuration, You can specify ports for your container. Nginx uses port 80. So type 80 in the host option and You can expose that to the container by typing 80 in the container option.
Enabling Auto remove option removes the container as soon as the container stops. This is useful when you need to use the container only once. Leave it off for now.
On the bottom of the screen, There are several advance options which we can leave for now. Your options should look like this
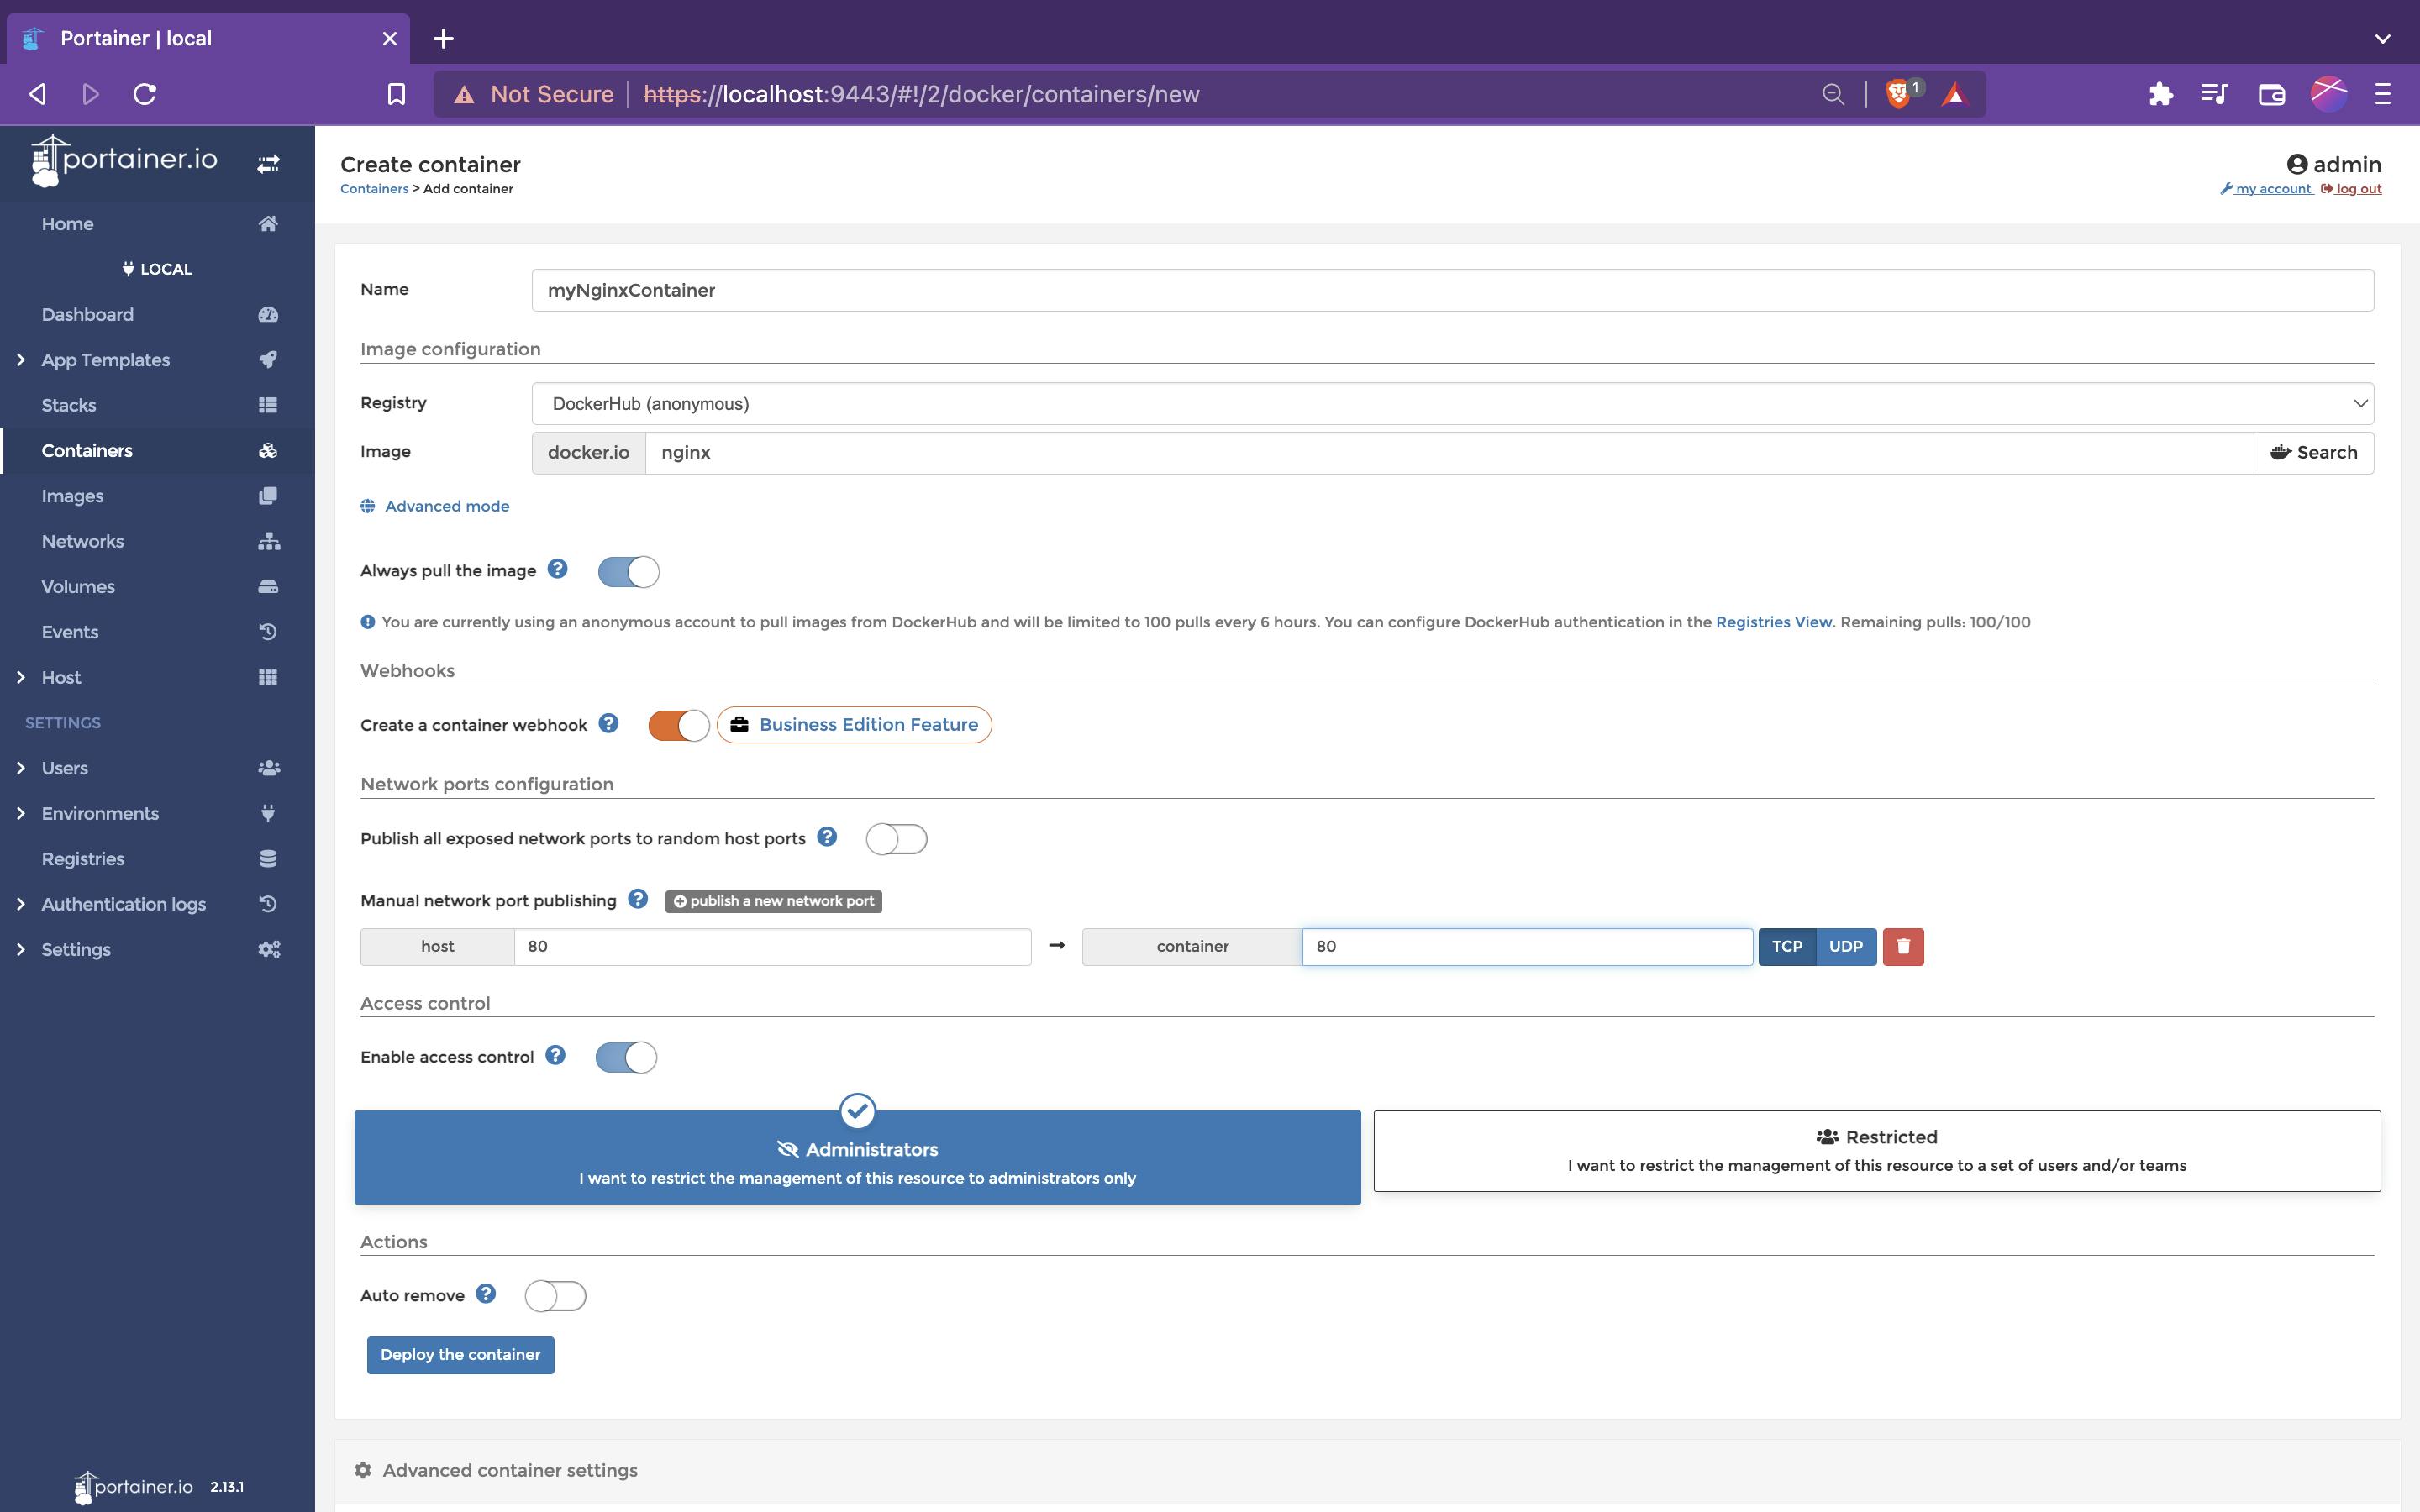
Now Go ahead and Click on the Deploy the container. If everything went smoothly, you will be redirected to Container list page and would see our myNginxContainer running.
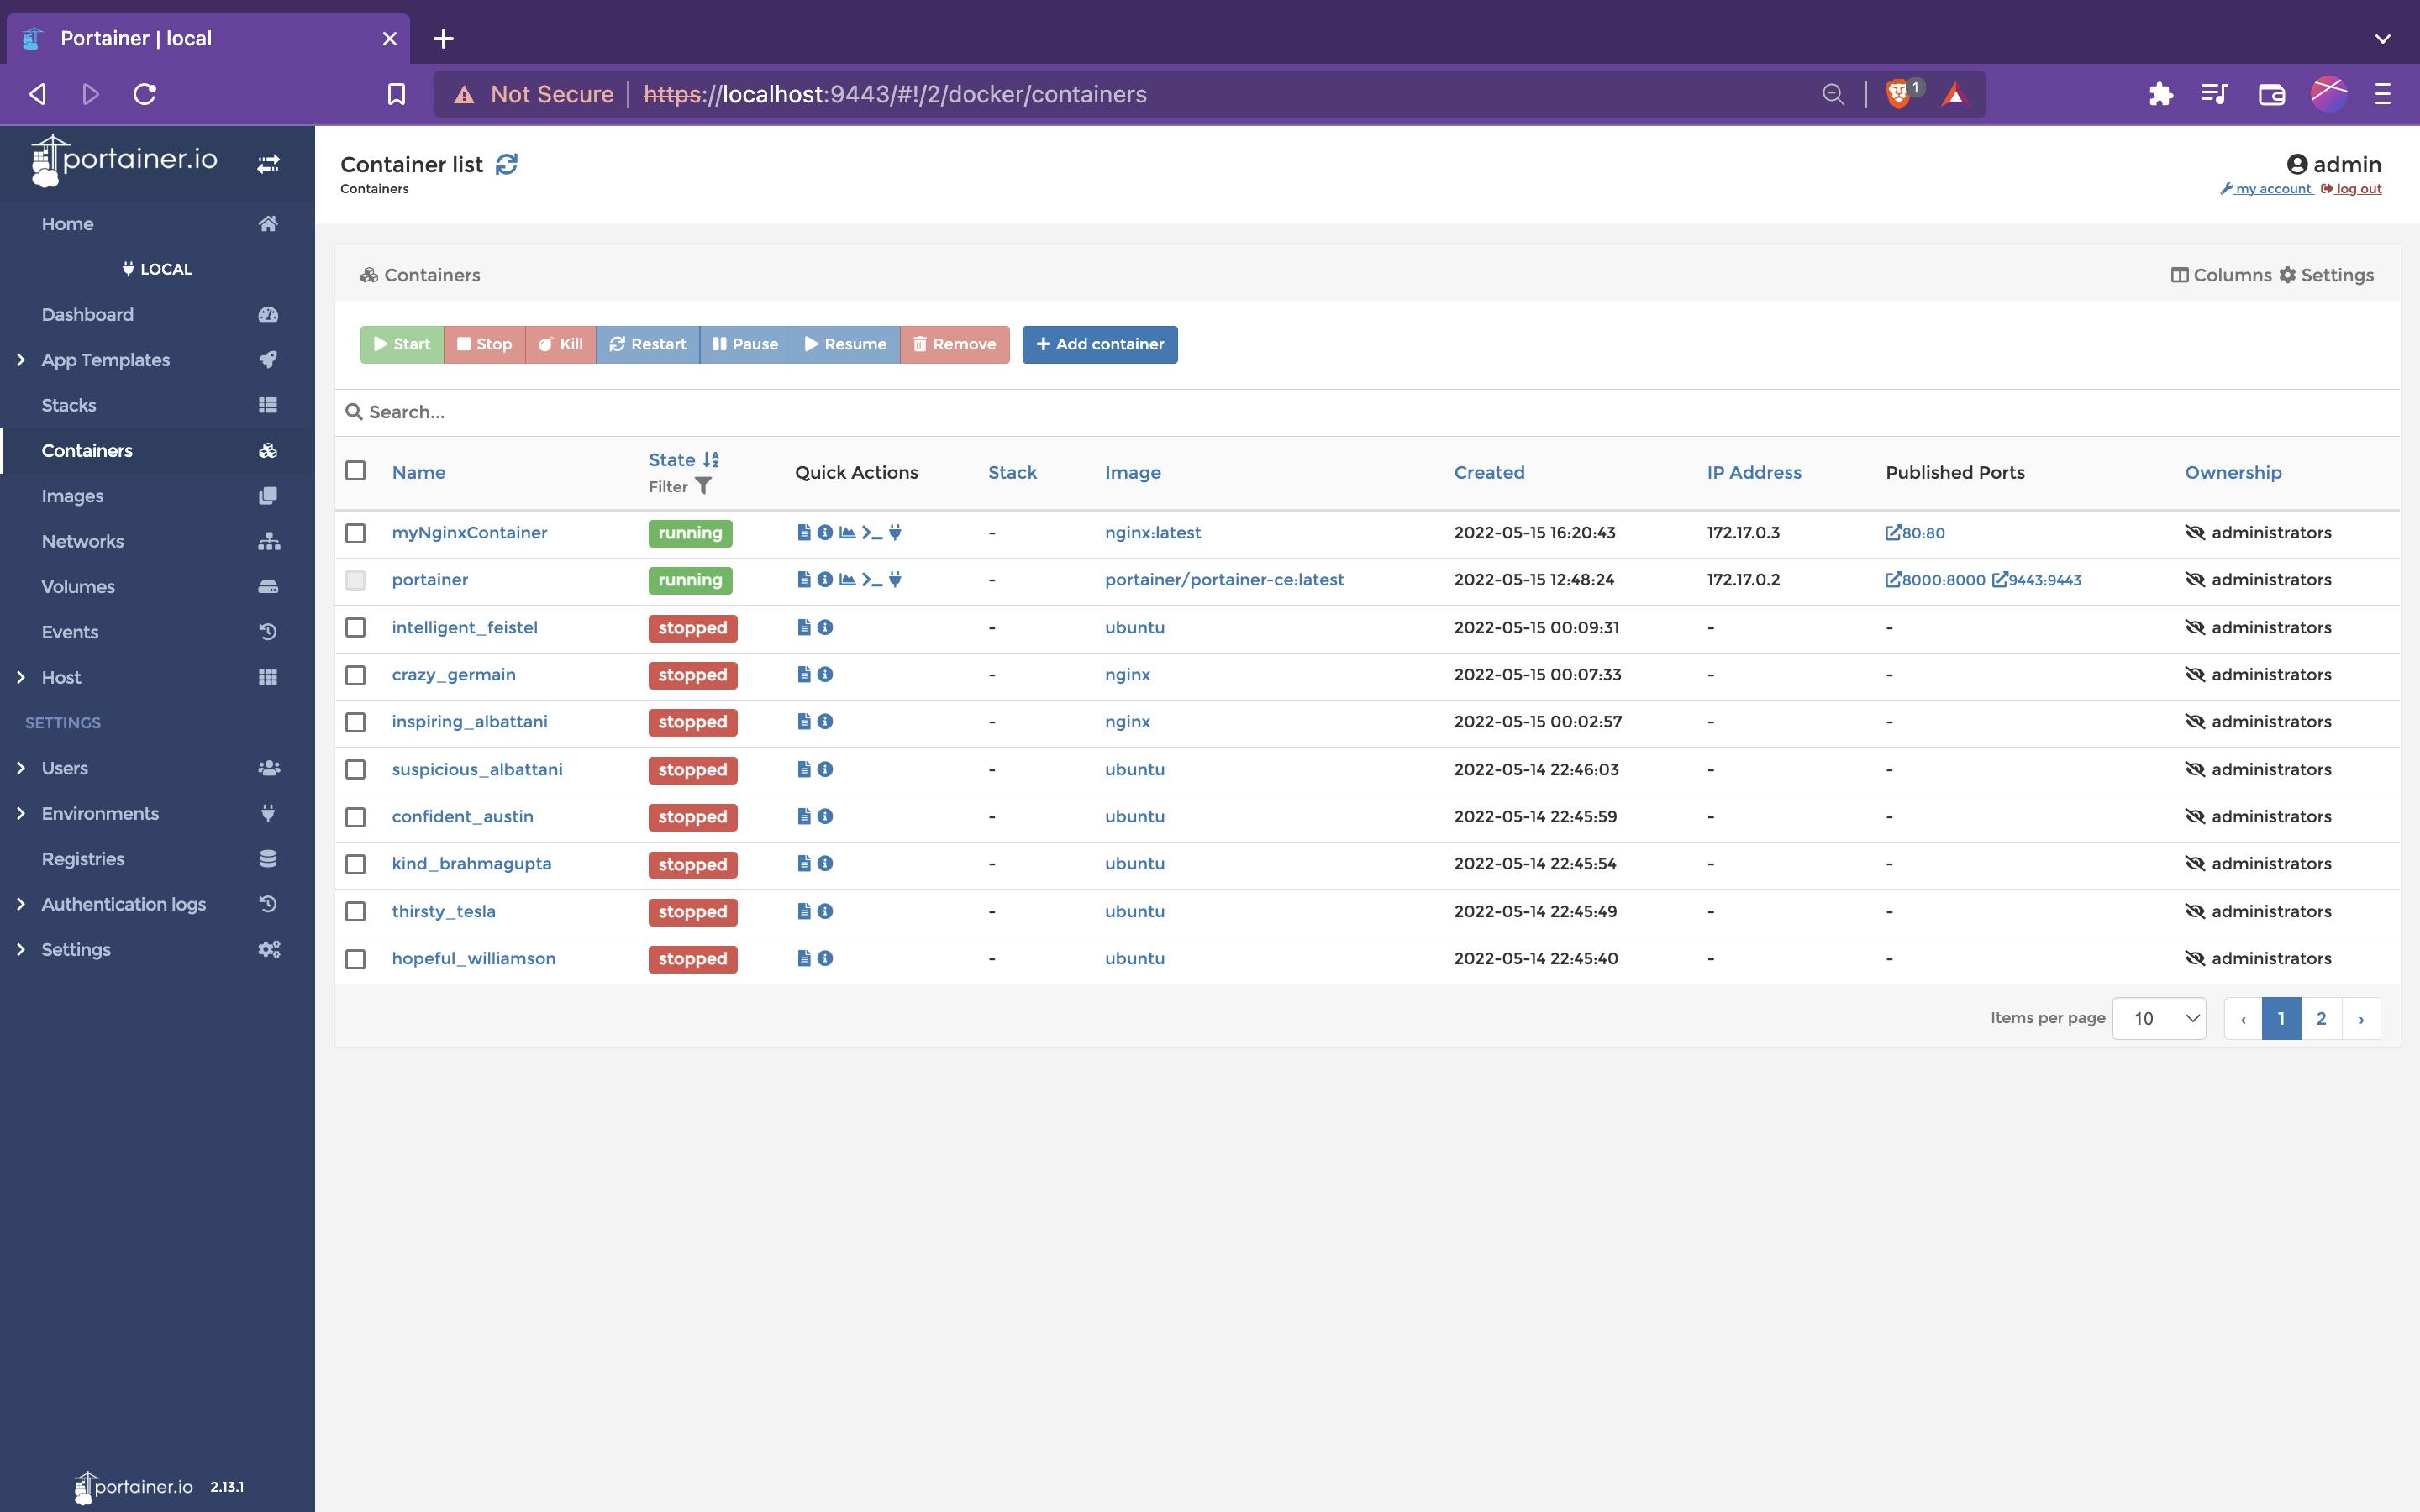
You can see that it pulled the nginx:latest image, IP address of container and also the ports that we assigned. You can also see some icons under quick actions.

You can hover over them to see the name, these are Logs, Inspect, Stats, Exec Console, attach Console.
They come quite handy, Say you are running an ubuntu container and you want to access the container from your terminal. So instead of having to type docker container exec -it container_id bash, You can just click on the Exec Console option and it will automatically give you a terminal in the browser window itself.
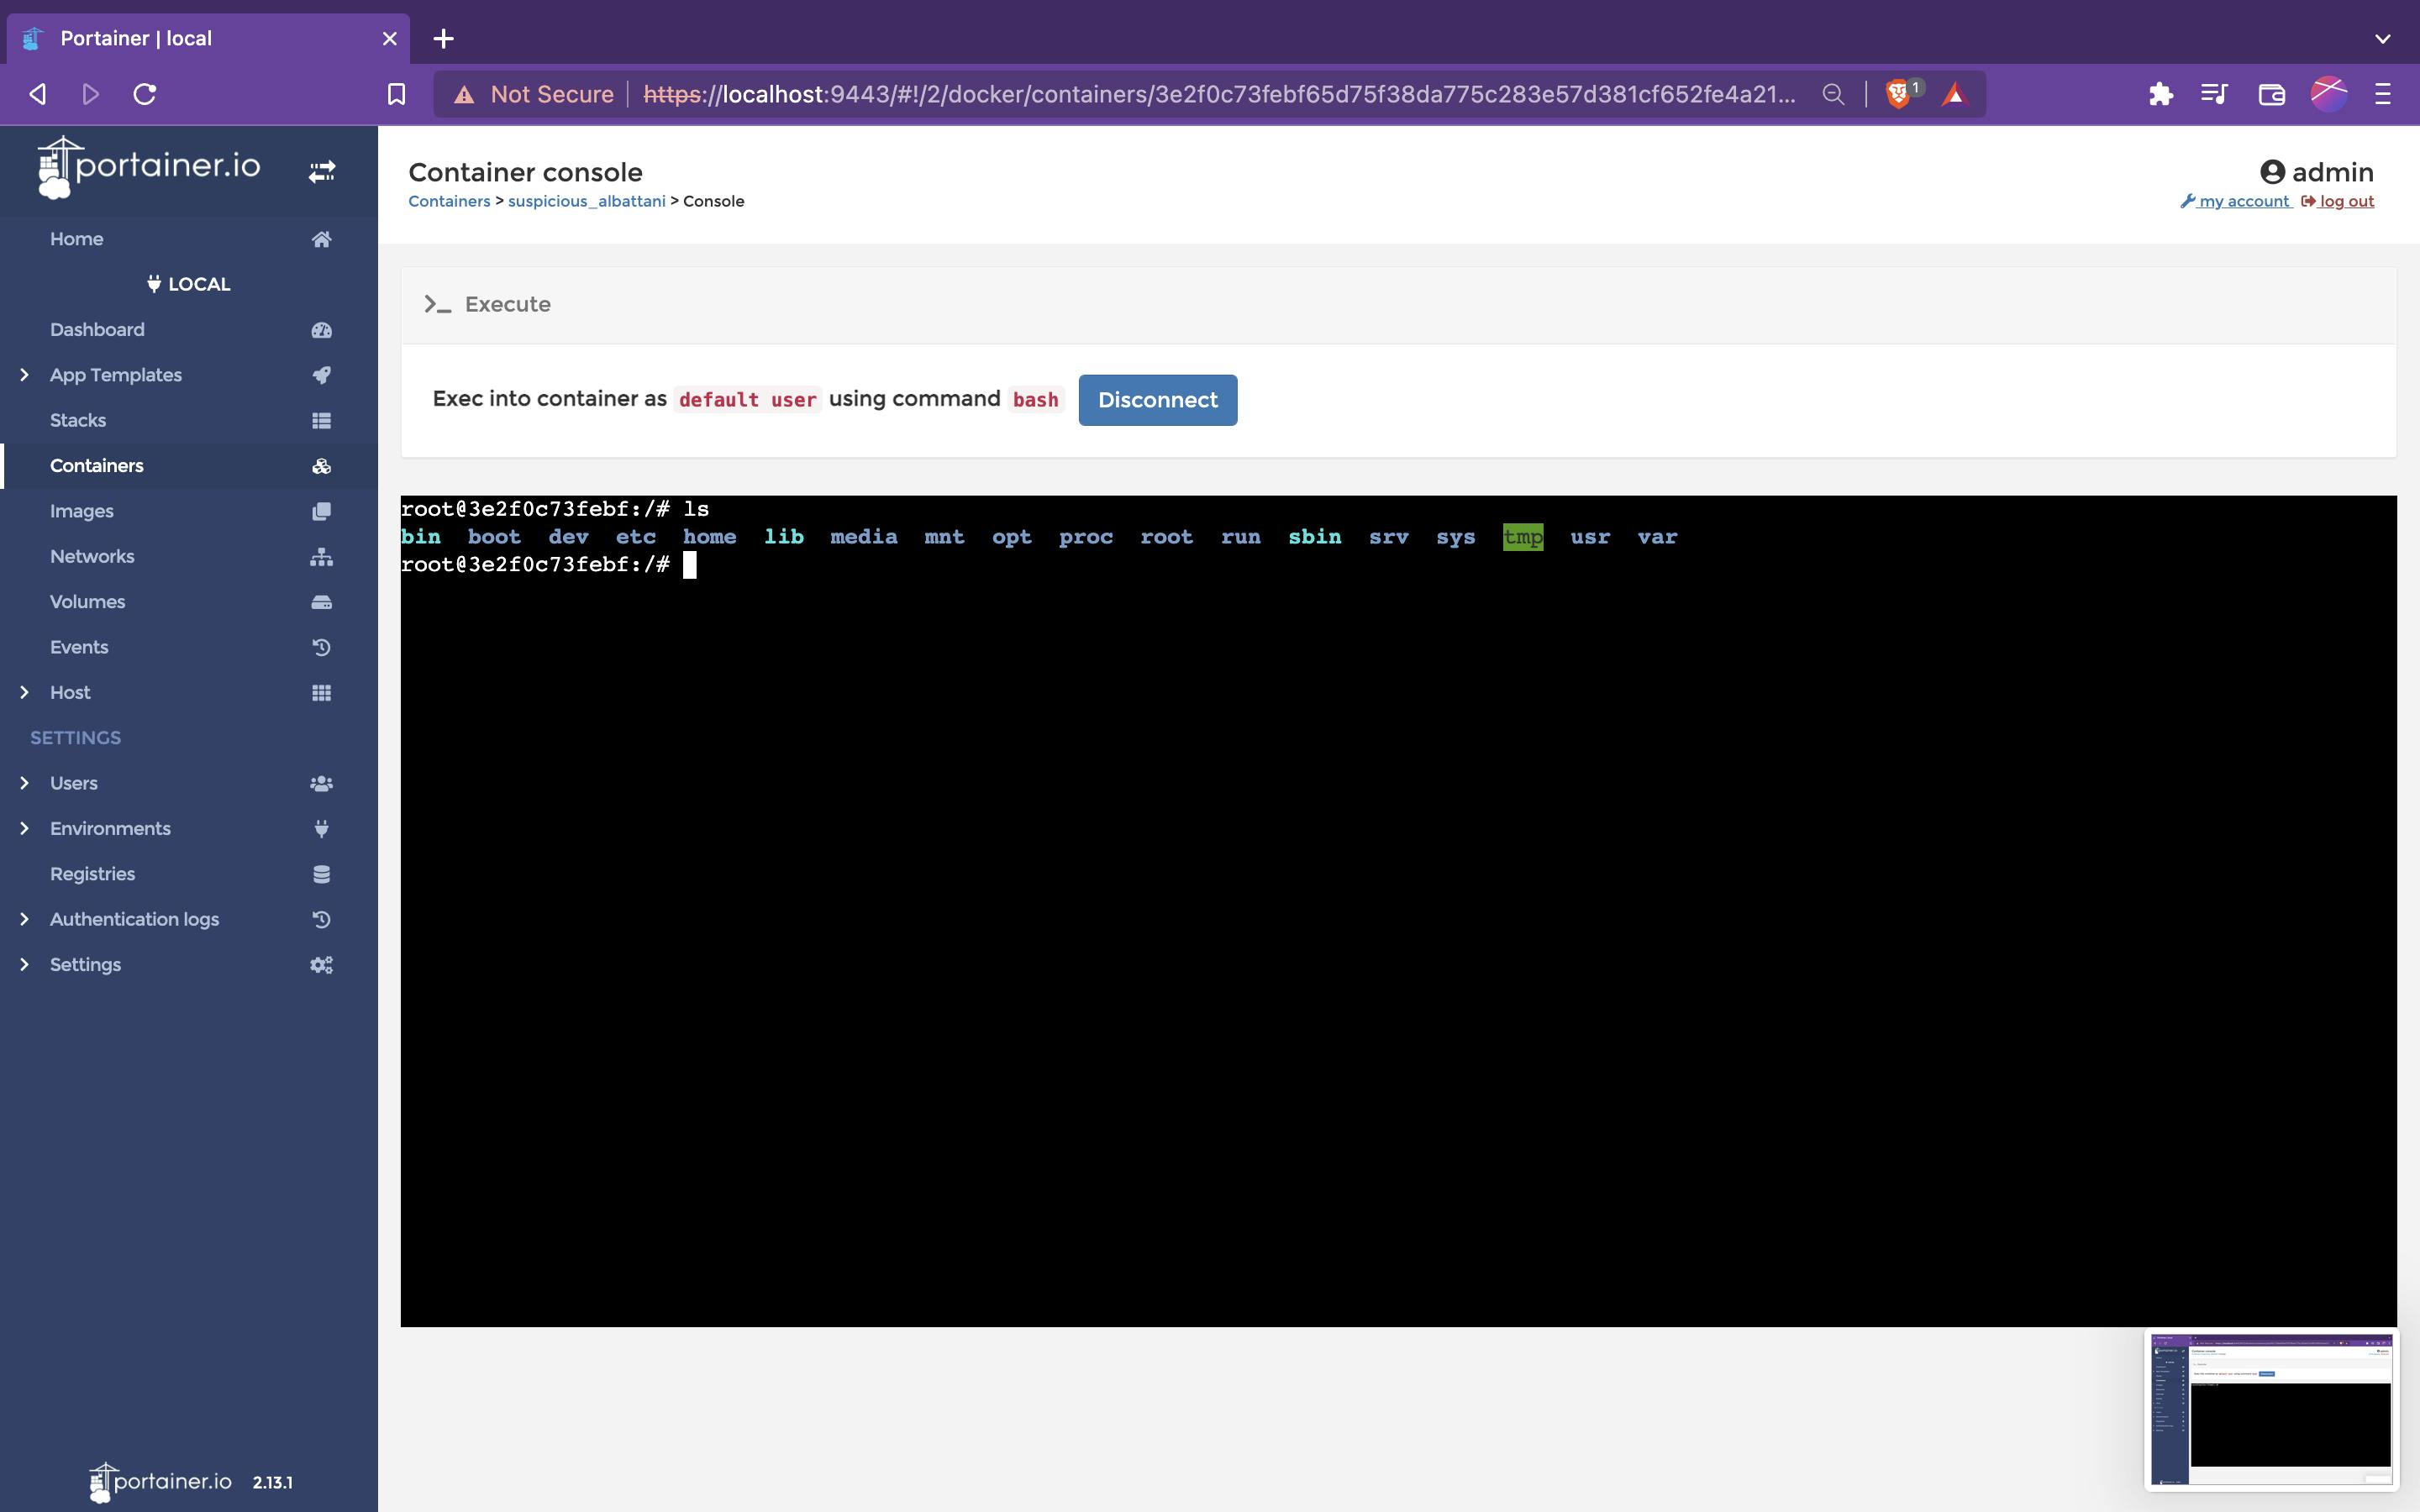
You can also click on the name of the container to see all the details.
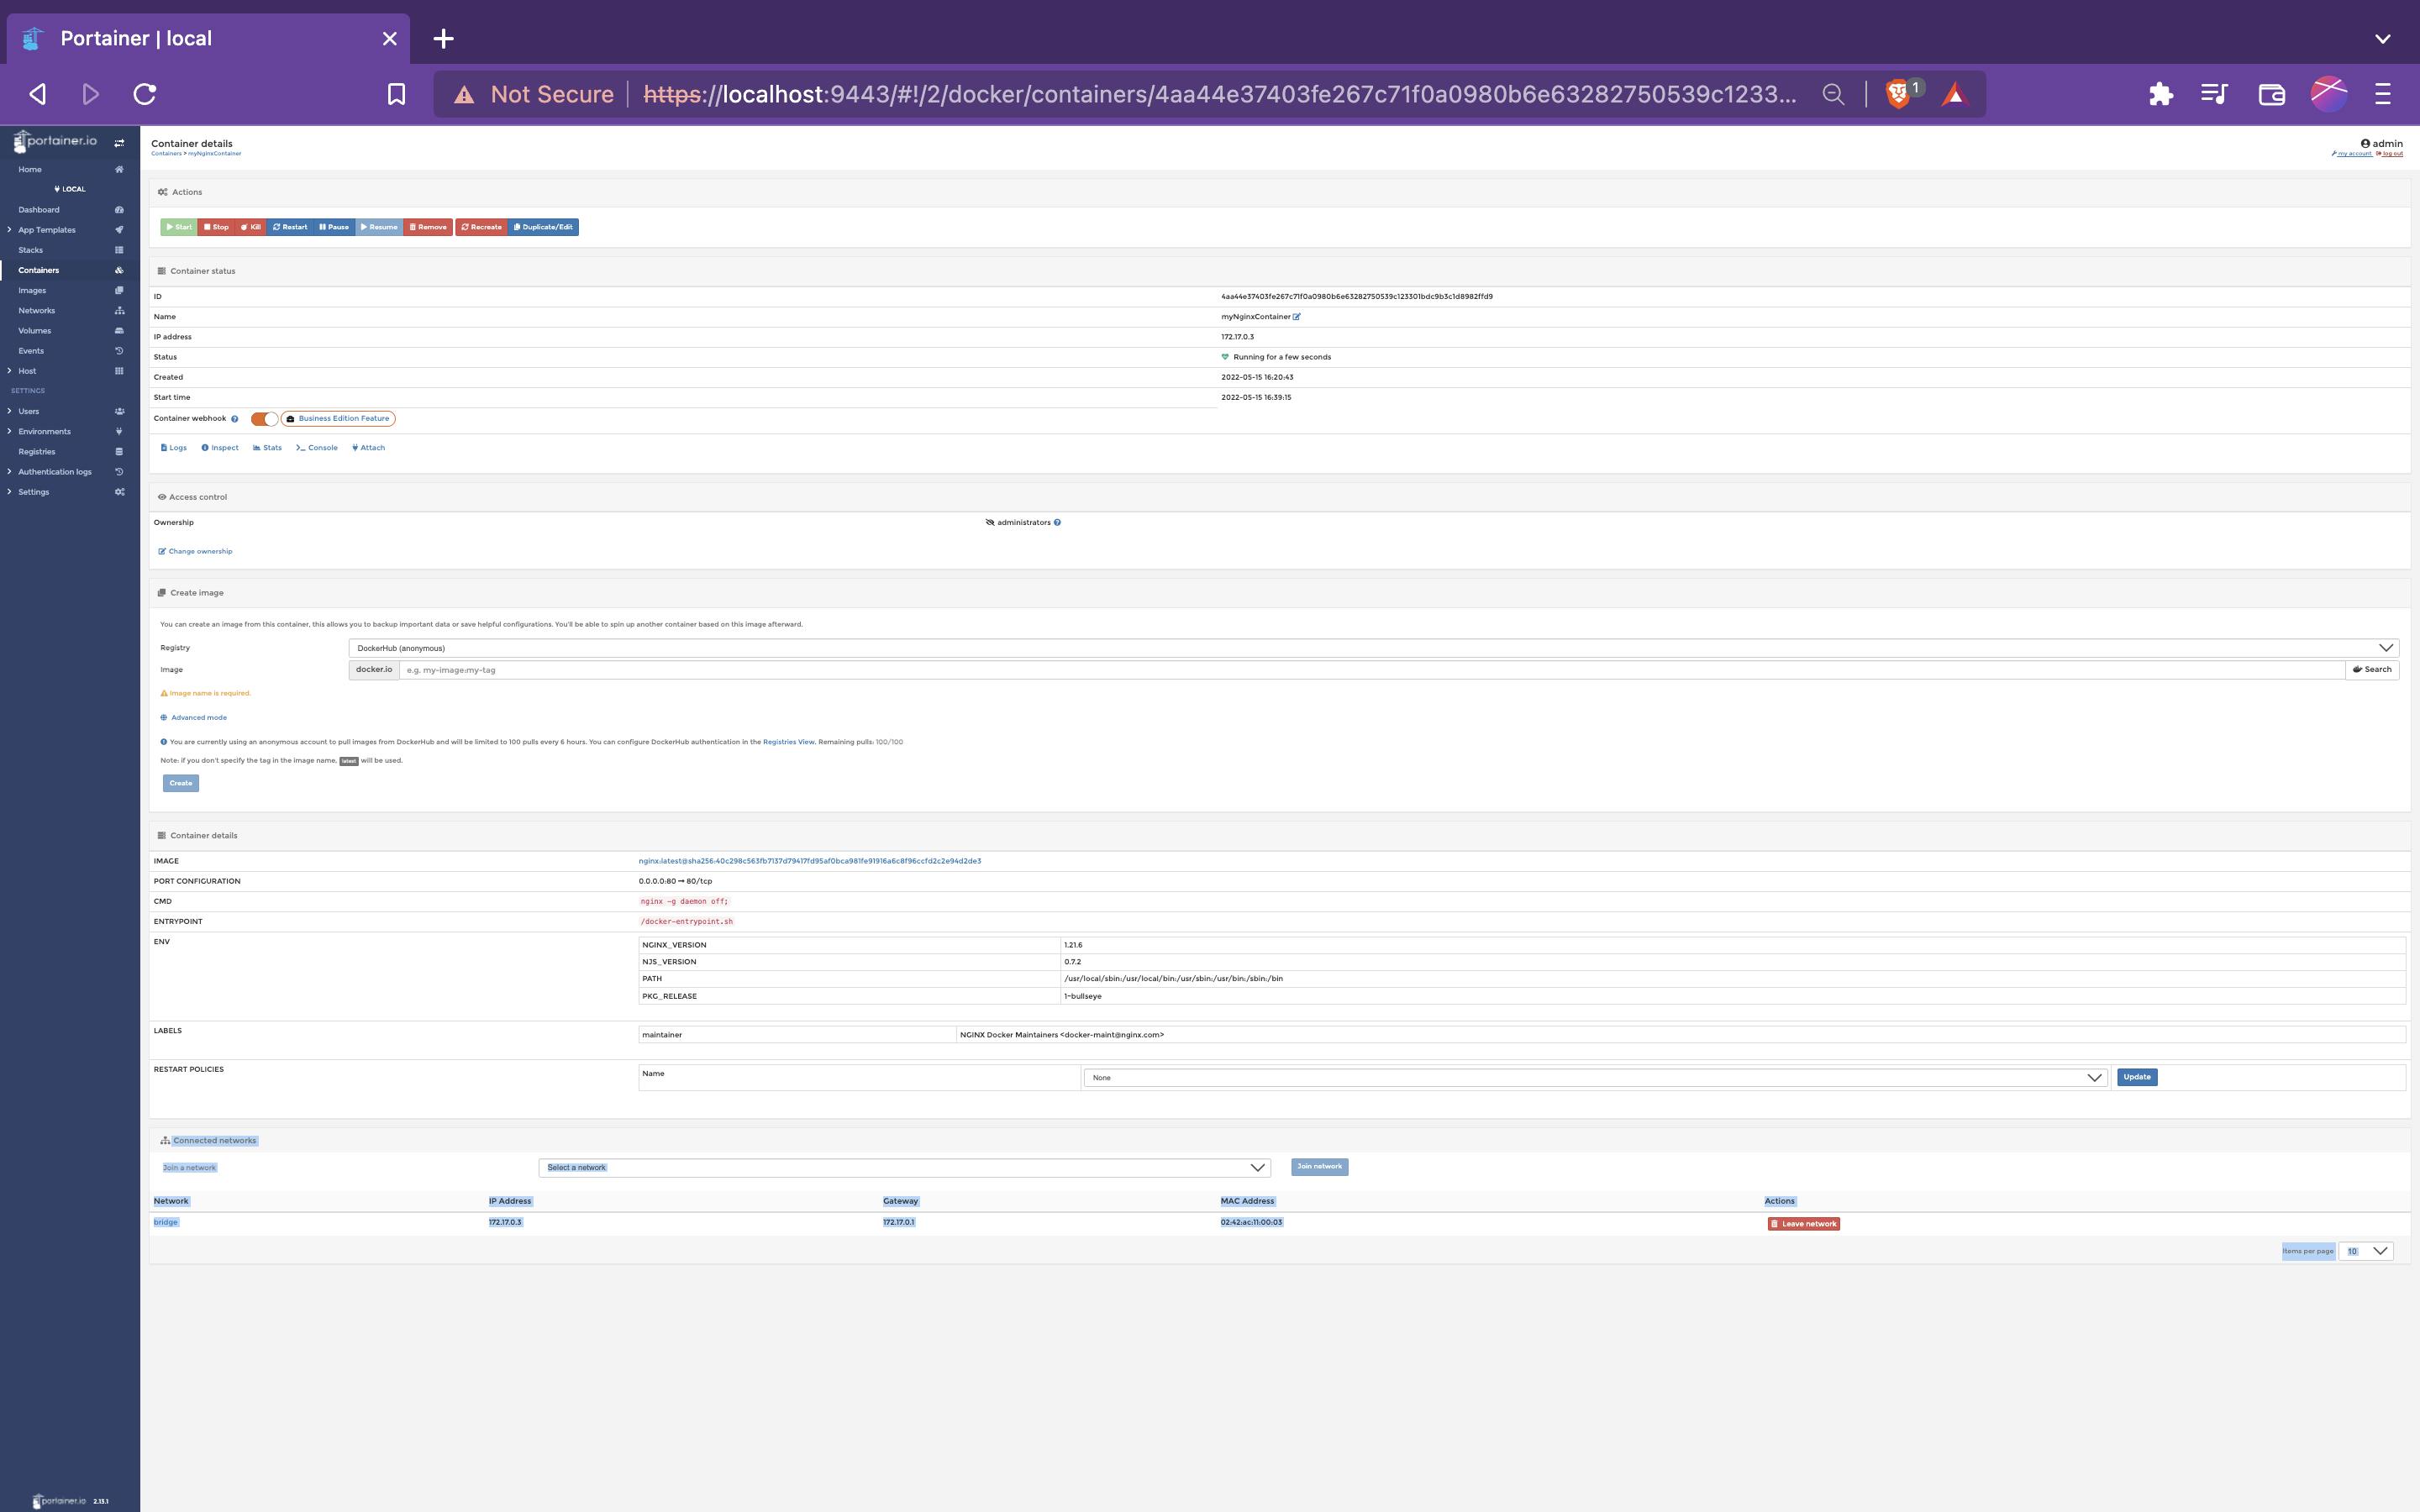
We saw how portainer helps in visualizing containers, makes it easier to manage them. We did a hands-on-demo on how you can add a container using portainer, the customizations that Portainer provides. We are done with the contents for this Blog.
Now Go ahead and click on Remove to remove the container.
Conclusion
As you can see portainer greatly improves the user experience for managing local containers you can do everything via the GUI without having to deal with the command line interface.
The more you will use Portainer, the more familiar you will become. You can try to build your own image using portainer.
There are a ton of other things Portainer can do such as manage kubernetes clusters, which is a topic for another blog. Keep learning. Cheers!
